

The Ultimate Guide to Homemade Vegan Pain Au Chocolat: Flaky, Buttery, and Irresistible
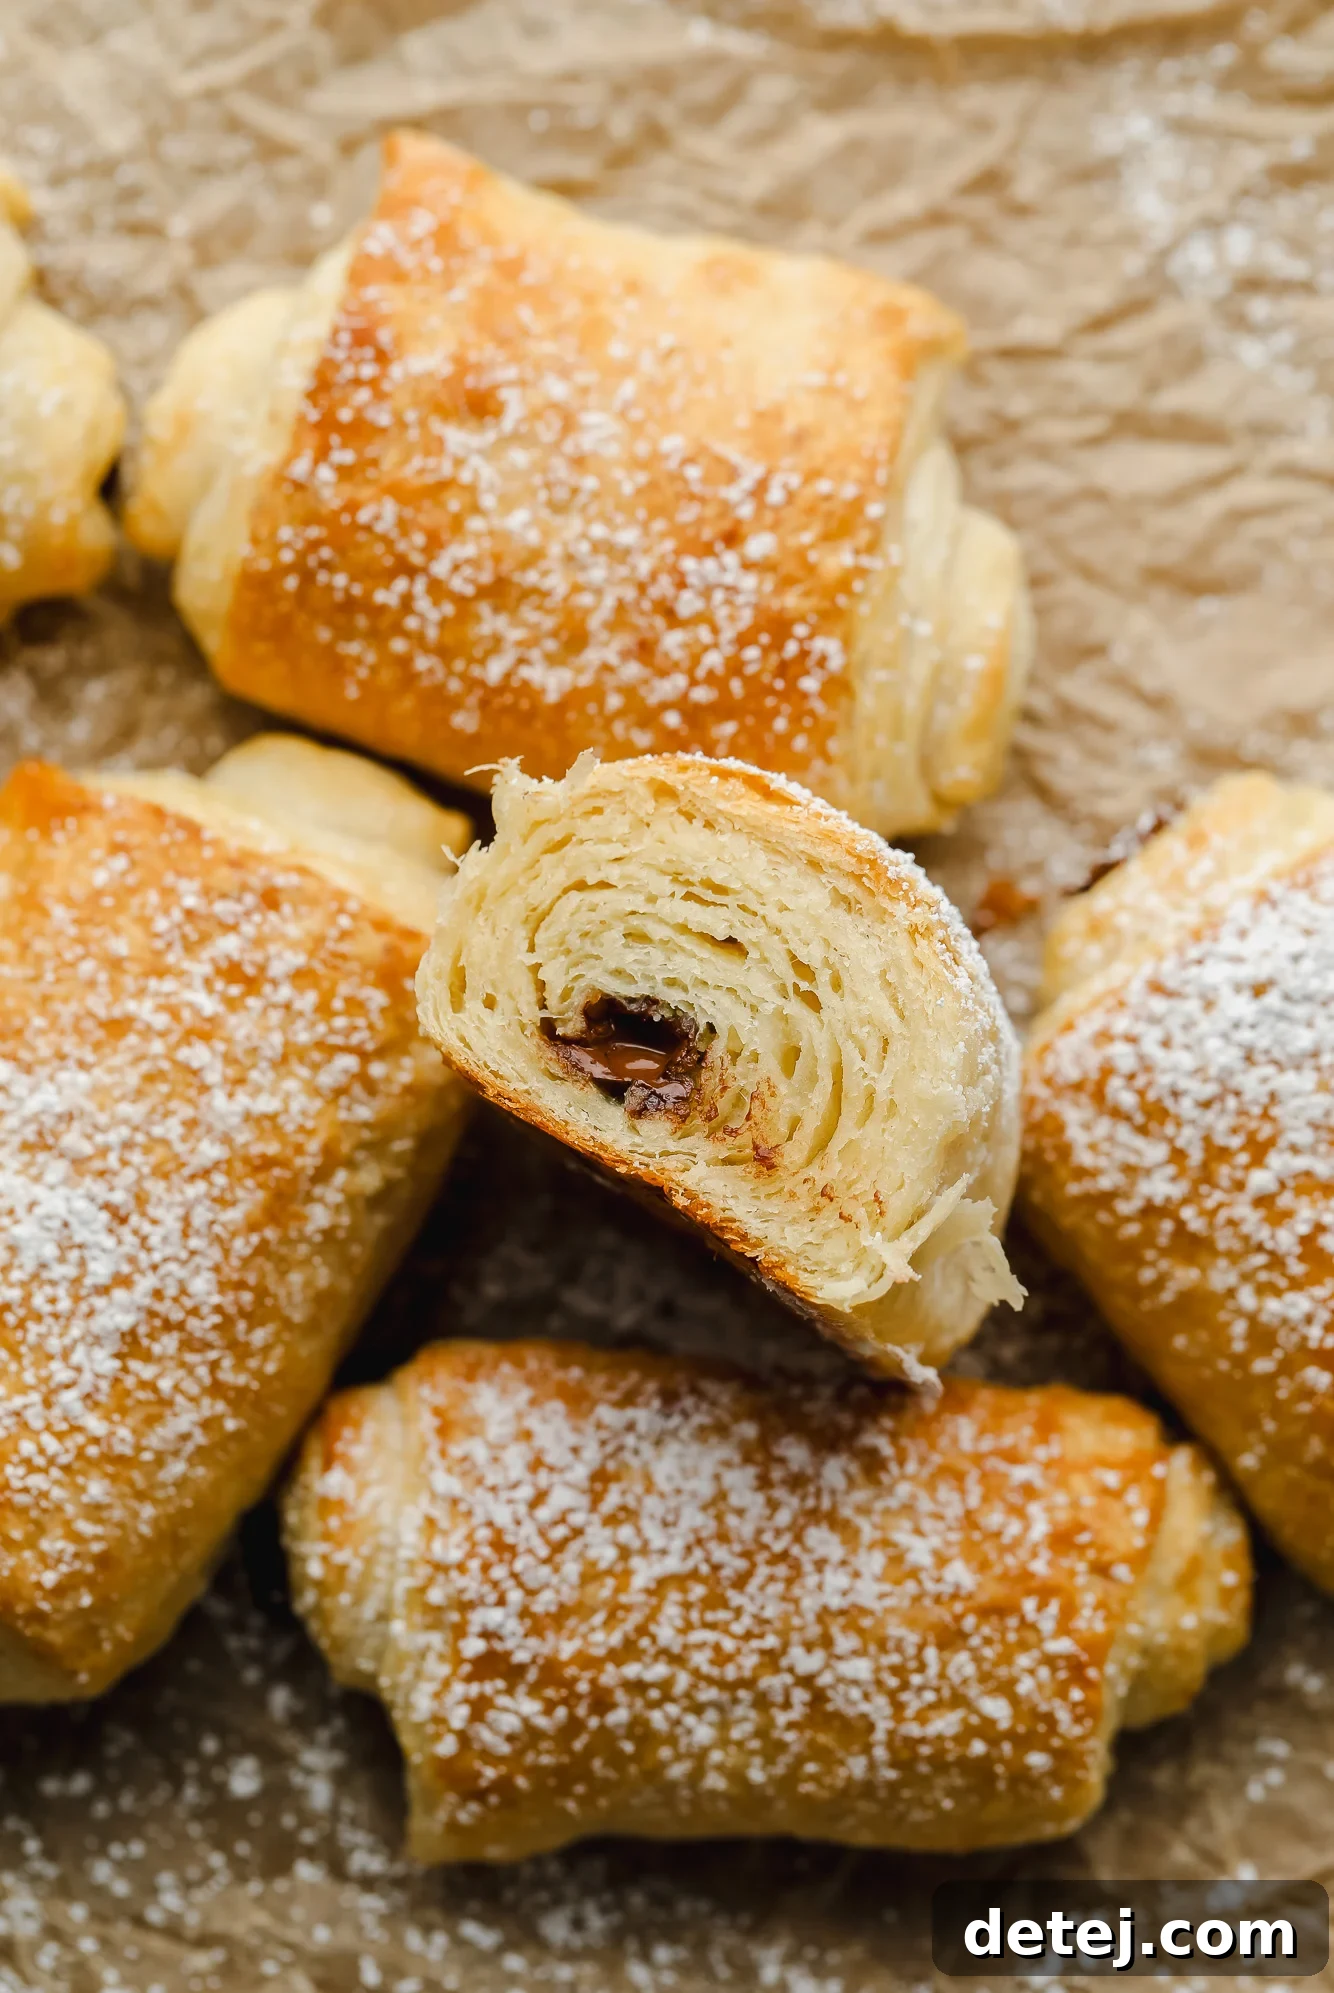
Imagine biting into a warm, freshly baked pastry, its delicate layers flaking perfectly as rich, melted chocolate oozes out. Now imagine that exquisite experience is entirely plant-based. Welcome to the world of homemade Vegan Pain Au Chocolat – a culinary dream come true, surprisingly achievable in your own kitchen. While many might consider croissants and their chocolate-filled counterparts a challenging endeavor, this recipe simplifies the traditional process, making those buttery, flaky layers and delightful chocolate centers accessible to every home baker.

Just like mastering classic vegan croissants, creating these delectable chocolate-filled beauties requires a touch of patience and attention to detail. However, this particular guide is crafted to demystify the process, ensuring you can whip up flaky, truly buttery vegan pain au chocolat (the French term for chocolate croissants) without unnecessary complications. Forget complicated techniques that deter even experienced bakers; we focus on clarity and simplicity, ensuring a rewarding baking journey from start to finish.
For many, there’s nothing quite like a freshly baked pastry paired with a steaming cup of coffee or tea to start the day. From the comforting warmth of vegan blueberry scones and the sweet indulgence of cinnamon rolls to the wholesome goodness of banana bread and the elegant charm of vegan eclairs, the world of vegan baking offers an endless array of delights. Yet, among these beloved bakery favorites, these homemade vegan chocolate croissants truly stand out as an unparalleled treat.
Why Embrace Homemade Vegan Pain Au Chocolat?
Choosing to bake vegan pain au chocolat at home offers a multitude of benefits, extending beyond just dietary preferences. It’s an opportunity to create something truly special, free from dairy and animal products, without compromising on taste or texture. Store-bought vegan croissants can be expensive and often lack the incredible flakiness and deep flavor of a homemade version. By making them yourself, you control the quality of ingredients, ensuring a wholesome and delicious pastry. This recipe provides an authentic experience, delivering the iconic layers and rich chocolate filling that define a true pain au chocolat, all while adhering to a plant-based lifestyle. It’s a testament to how incredible vegan baking can be, proving that no indulgence needs to be off-limits.
To be completely transparent: This recipe isn’t the quickest or easiest you’ll ever undertake. Crafting traditional croissants, vegan or otherwise, involves a multi-step process that demands patience. While you could opt for a shortcut by using pre-made puff pastry for a faster version of chocolate pastries, it simply won’t replicate the distinct, airy, and deeply satisfying layers achieved by making fresh croissant dough from scratch. The difference in texture, flavor, and overall experience is truly incomparable.
That being said, we’ve meticulously simplified the process as much as possible, breaking it down into manageable steps. The majority of the time involved isn’t active work but rather periods of waiting – for the dough to rise, for the butter to chill, and for the flavors to develop. These resting phases are crucial for achieving the characteristic flaky texture and buttery richness. Rest assured, with a little planning and a lot of anticipation, you’ll be enjoying your own warm, golden-brown vegan pain au chocolat in a matter of hours, making every moment of preparation worthwhile.
The Art of Lamination: Creating Those Perfect Flaky Layers
At the heart of any magnificent croissant, including our vegan pain au chocolat, lies the magical process of lamination. This technique involves repeatedly folding and rolling butter into dough, creating hundreds of ultra-thin layers that separate and puff up during baking, resulting in that signature airy, flaky texture. For vegan croissants, choosing the right vegan butter is paramount. A high-quality, cold, stick-style vegan butter will mimic dairy butter’s properties, making the lamination process smoother and the end result truly exceptional. The key to successful lamination is maintaining a consistently cold temperature throughout. If your butter becomes too soft, it will integrate into the dough rather than forming distinct layers, preventing the desired flakiness. Patience during the chilling phases is not just recommended; it’s absolutely essential for achieving bakery-quality results at home.
Essential Ingredients for Success
Before diving into the step-by-step creation of these delightful pastries, let’s briefly consider the key ingredients. Each component plays a vital role in achieving the perfect vegan pain au chocolat:
- All-Purpose Flour: Provides the structure for our dough. While other flours exist, all-purpose is ideal for achieving the right elasticity and texture.
- Granulated Sugar: Not just for sweetness, sugar also contributes to the dough’s tenderness and helps with browning during baking.
- Instant Yeast: Essential for leavening, giving the croissants their airy lift. Instant yeast is preferred as it doesn’t require proofing beforehand.
- Salt: Balances the sweetness and enhances the overall flavor of the pastry. Don’t skip it!
- Cold Vegan Butter Sticks: This is arguably the most critical ingredient. Stick-style vegan butter works best for lamination due to its firm consistency. Keeping it very cold is non-negotiable for creating distinct layers.
- Soy Milk (or other plant-based milk): Provides moisture for the dough and helps activate the yeast. Soy milk offers a good fat content, contributing to richness.
- Vegan Chocolate Chips or Batons: The star of the show! High-quality vegan chocolate is crucial for a rich, melty center.
- Maple Syrup (for egg wash): Combined with soy milk, it creates a golden, shiny finish, replacing traditional egg wash.
Gathering these ingredients and ensuring your vegan butter is properly chilled will set you up for success.
Step-by-Step Guide: Crafting Your Vegan Pain Au Chocolat
You’ll find the complete printable recipe with precise measurements below in the detailed recipe card section. These steps provide a comprehensive overview to guide you through the process.
1. Prepare the Dough Base
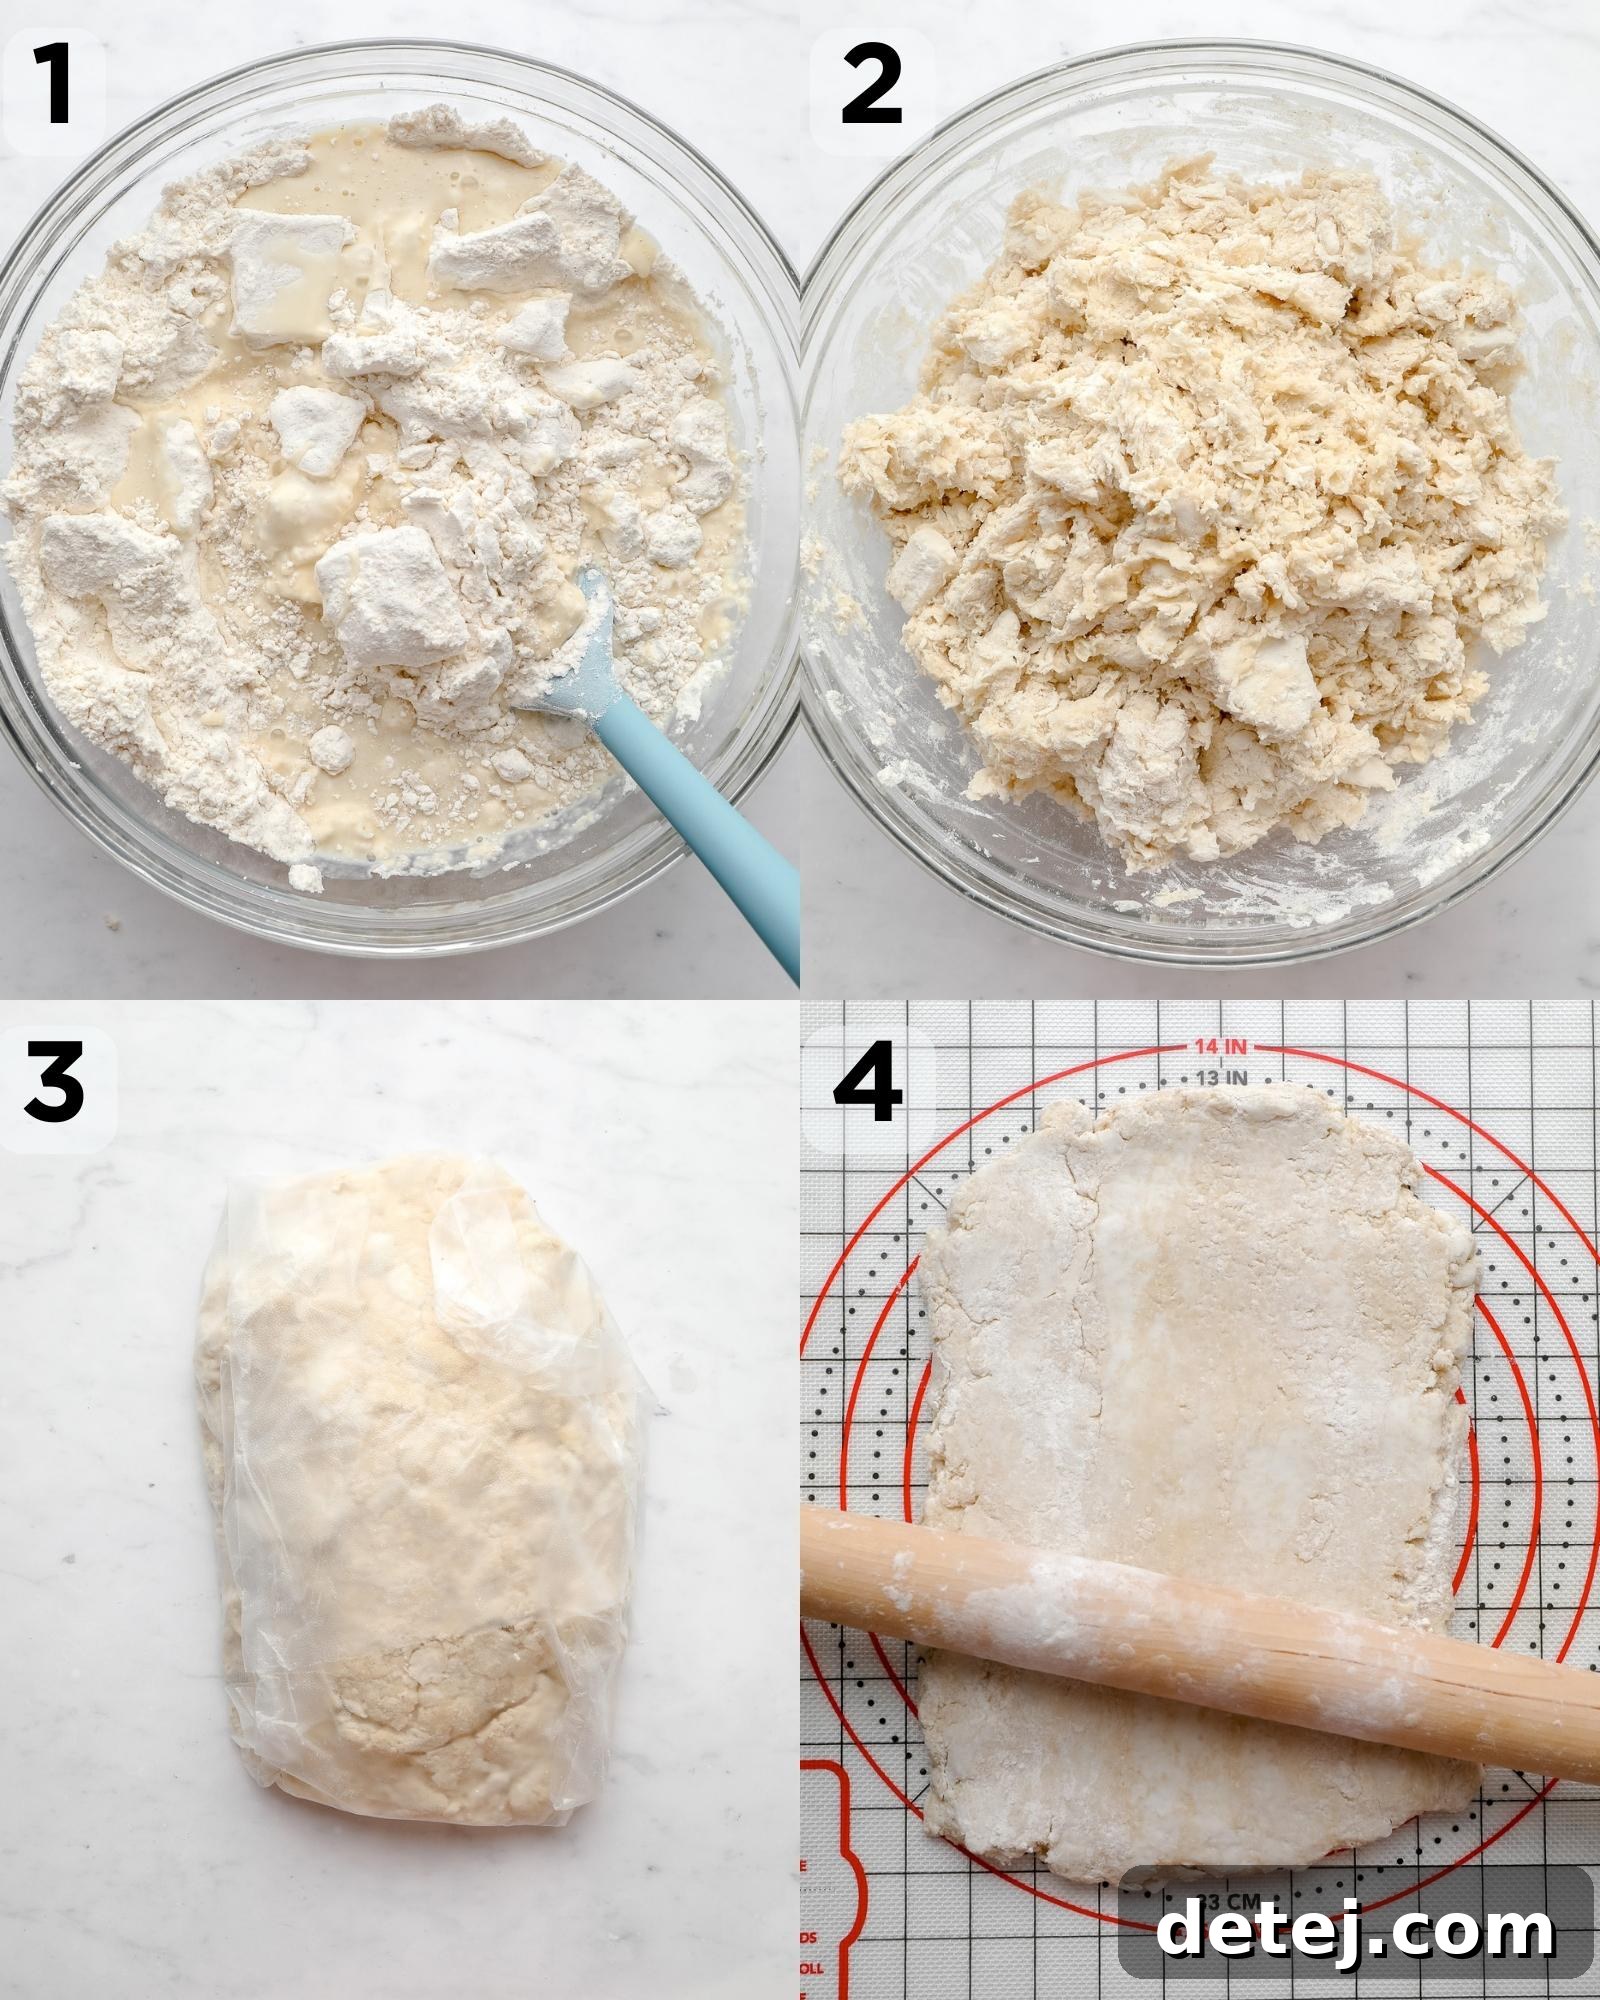
Begin by whisking together the dry ingredients: flour, sugar, instant yeast, and salt in a large mixing bowl. Once thoroughly combined, take your very cold vegan butter and slice it into thin pieces, approximately 1/8 inch thick. Gently toss these butter slices into the dry mixture using a spatula. The goal here is to coat the butter in flour without breaking it down too much – you want distinct chunks. Next, pour in the soy milk. Stir carefully until a rugged, stiff dough forms, still featuring noticeable chunks of butter. Avoid overworking the dough or using your hands excessively at this stage, as the warmth from your hands can melt the butter, which we absolutely want to avoid.
2. The First Chill and Roll
Once your rugged dough is formed, wrap it tightly in a layer of plastic wrap or an eco-friendly alternative. This tight seal prevents the dough from drying out. Transfer it to the refrigerator to chill for a minimum of 1 hour. This initial chill is vital for firming up both the dough and the butter, preparing it for the lamination process. After chilling, remove the dough and place it on a lightly floured surface. Roll it out into a long, somewhat rectangular shape. Don’t worry if it looks a bit uneven at first; it will become smoother with subsequent folds and rolls.
3. Performing the Folds (Lamination)
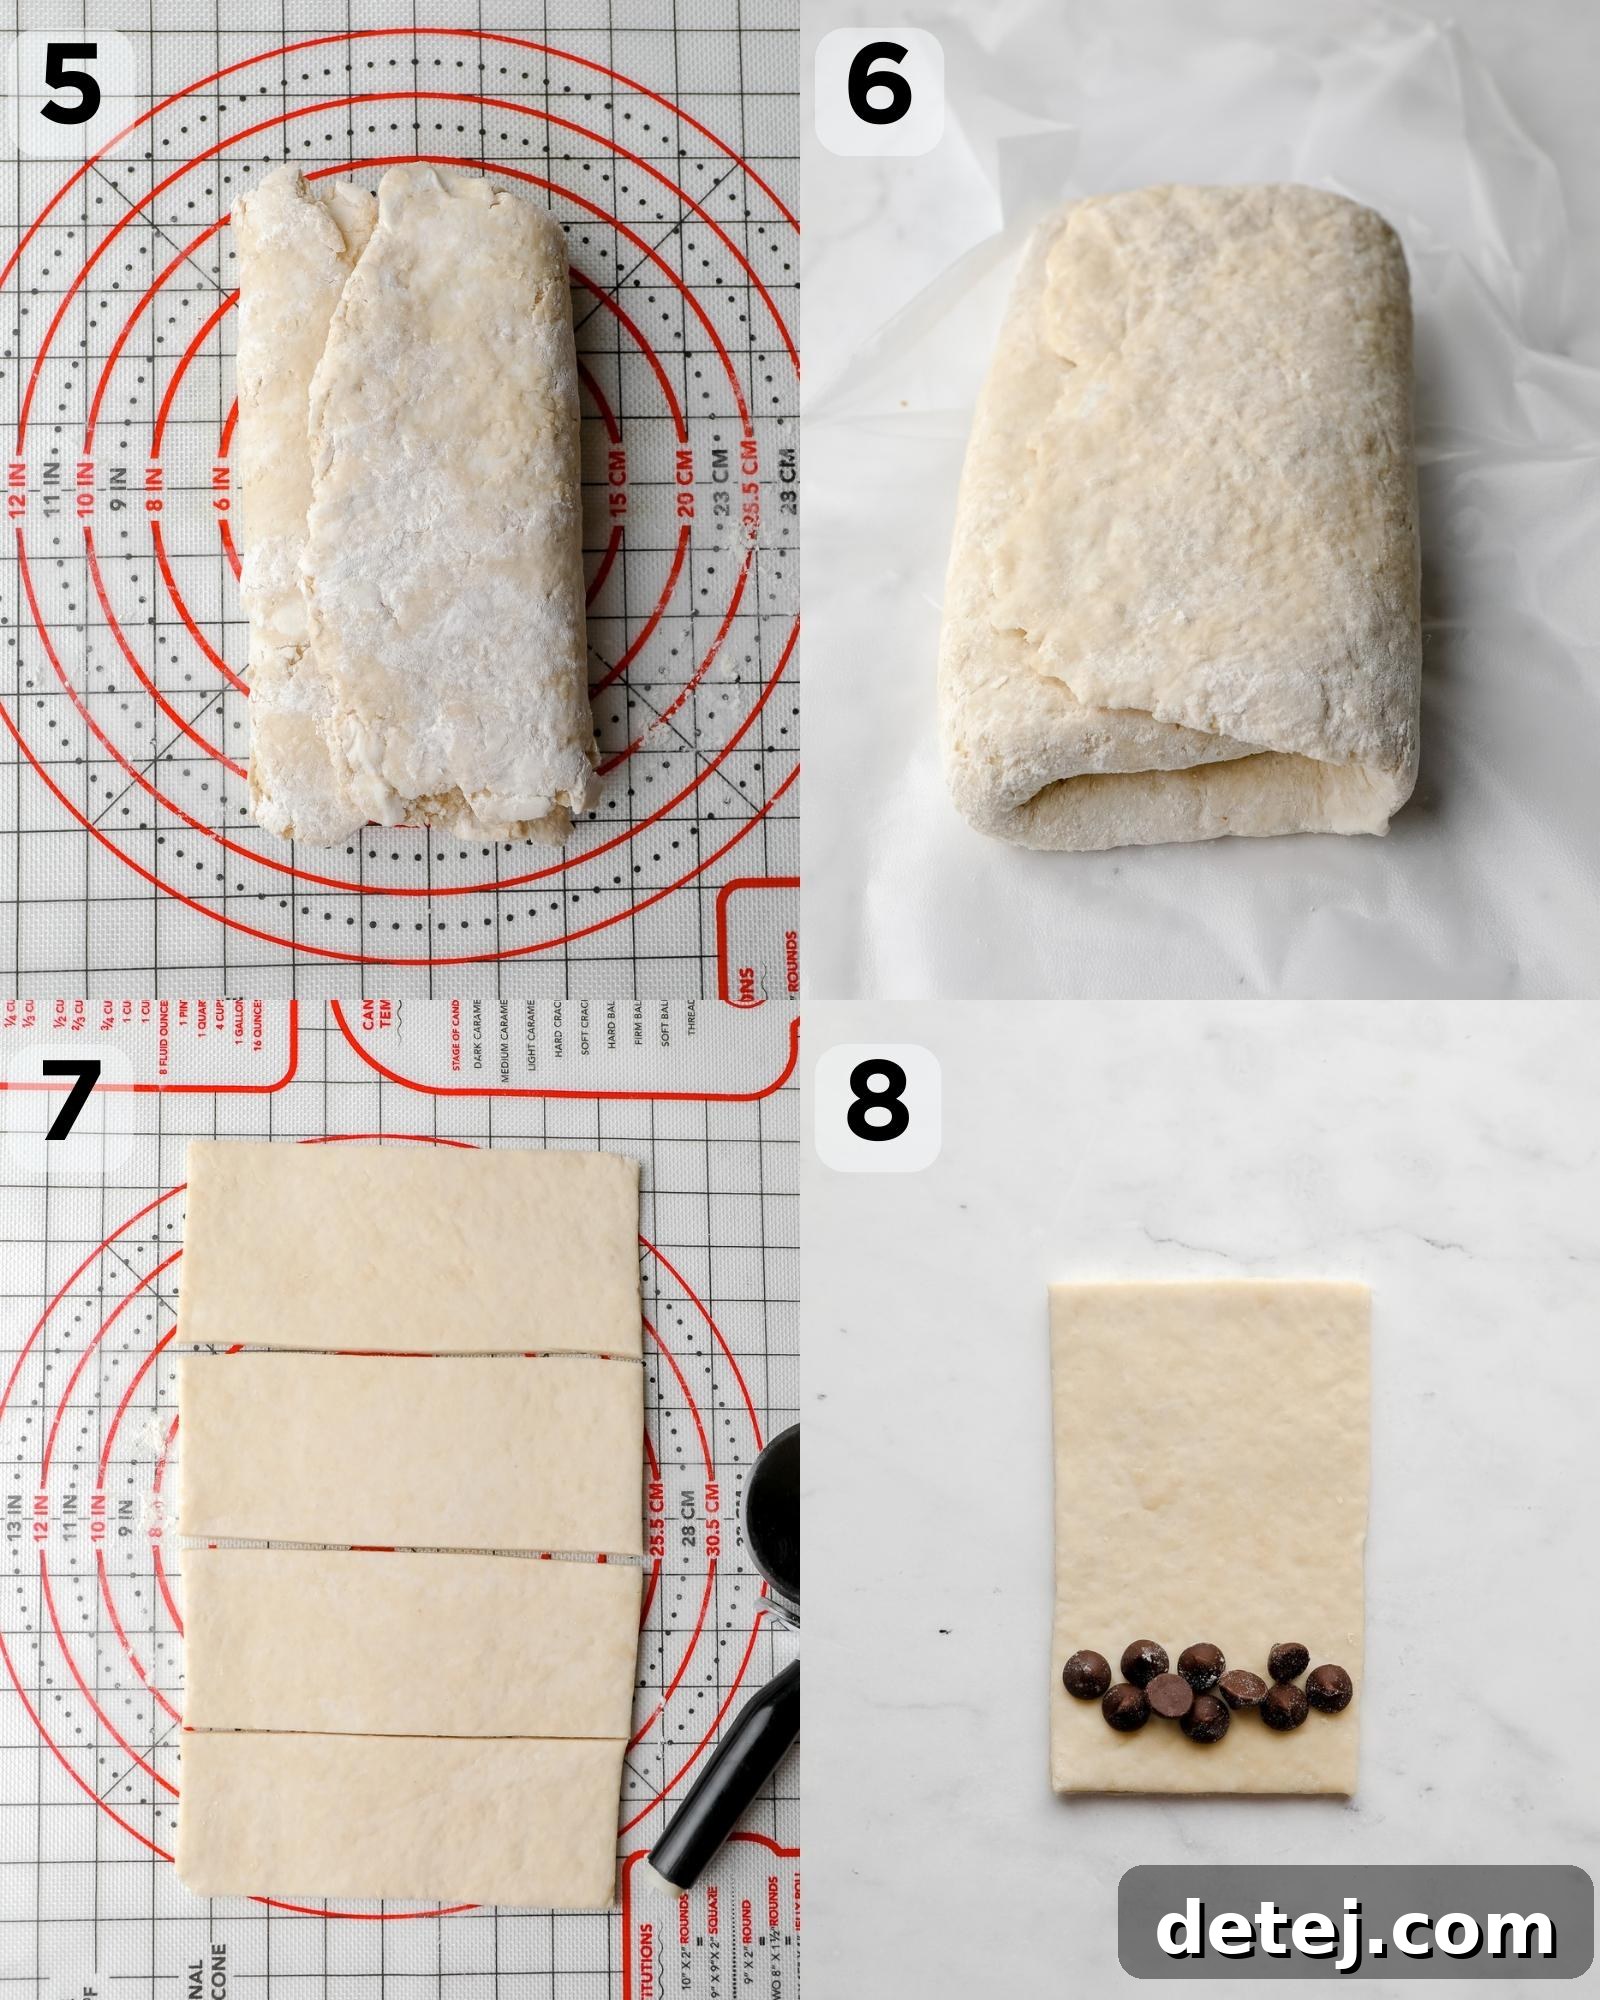
Now comes the classic lamination technique. Fold the dough into thirds, much like you would fold a letter. Ensure the edges meet neatly. Once folded, gently roll the dough out again into a large rectangle. After rolling, rotate the dough 90 degrees. This rotation is crucial for creating even layers in different directions. Repeat this roll-and-fold process an additional 5 times. Throughout this entire lamination phase, you should observe large streaks of butter within the dough layers, indicating proper separation. The dough itself should gradually become smoother and more pliable. If at any point the butter begins to soften and become difficult to work with, immediately return the dough to the refrigerator or even the freezer for a short period until it stiffens up again. This temperature control is key to successful lamination.
4. Final Chill and Shaping
After completing all the folds, wrap the dough tightly once more and return it to the refrigerator for another hour of chilling. This ensures it’s firm and easy to handle for shaping. Once thoroughly chilled, divide the dough in half; this makes it much more manageable to work with. Take one half and roll it out into a large rectangle, aiming for dimensions of approximately 20 inches long by 10 inches wide and about 1/8 inch thick. Use a pizza cutter or a sharp knife to trim away any uneven edges, creating a perfectly clean rectangle. Then, cut this larger rectangle into smaller, individual rectangles, which will become your pain au chocolat.
5. Adding Chocolate and Rolling
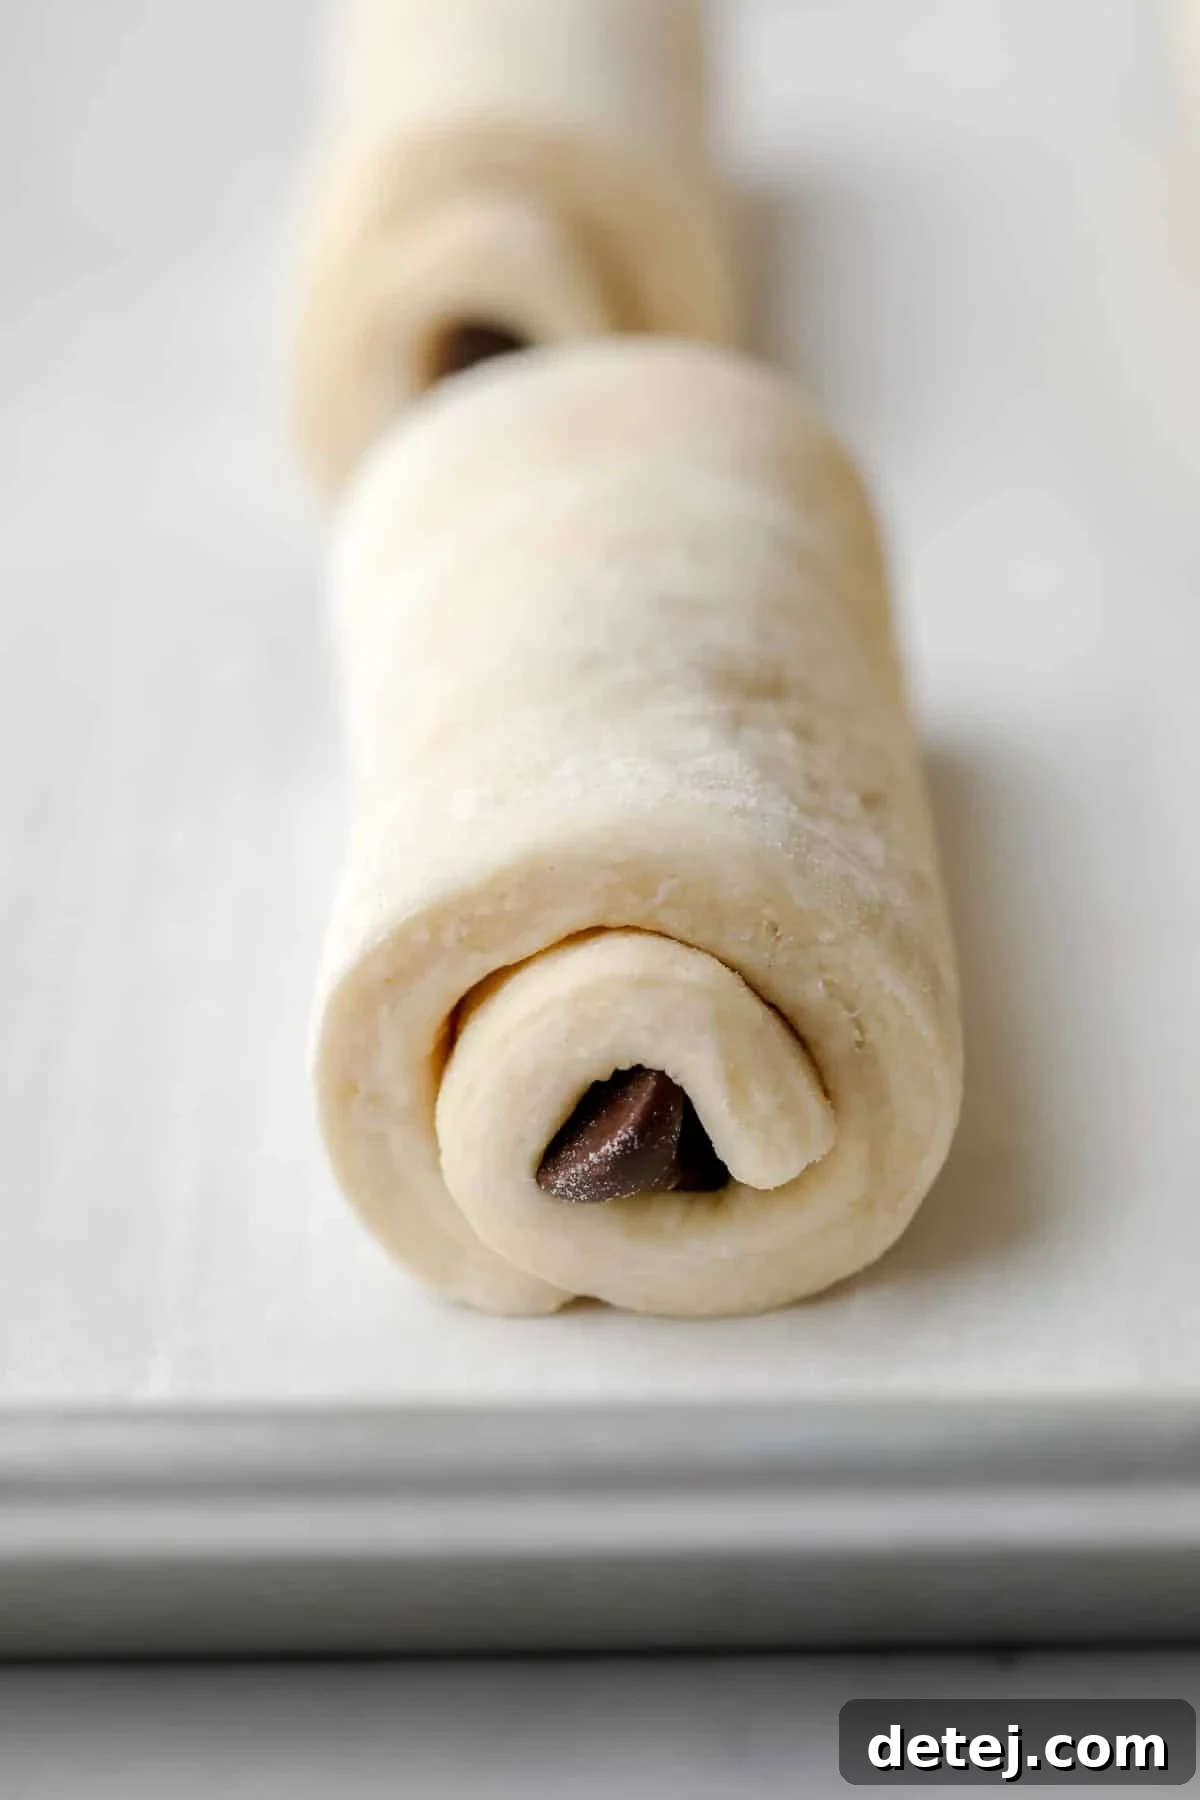
For each smaller rectangle, arrange a line of vegan chocolate chips (or chocolate batons/chopped chocolate bars) along the edge closest to you. Carefully begin to roll the dough upwards, encasing the chocolate. For an extra chocolatey experience, you can add a second line of chocolate about 1.5 inches from the other side of the rectangle as you roll it up. Once rolled, gently tuck the seam underneath the pastry to secure it. This prevents it from unrolling during baking.
6. Proofing, Preheating, and Baking
Place your shaped vegan pain au chocolat on a parchment-lined baking pan, ensuring they have enough space between them to expand. Loosely cover them with plastic wrap or a clean kitchen towel and allow them to rise at room temperature for approximately 1 hour. This proofing stage allows the yeast to activate and the pastries to puff up. After proofing, place them in the refrigerator or freezer for 30 minutes while your oven preheats to 375 degrees F (190 degrees C). This final chill helps the butter firm up one last time before hitting the heat, contributing to superior flakiness.
7. The Vegan Egg Wash and Final Bake
In a small bowl, whisk together pure maple syrup and soy milk to create a simple yet effective vegan egg wash. This mixture will give your pain au chocolat a beautiful golden-brown, shiny crust. Gently brush this wash over the surface of each pastry. Place the pan in the center rack of your preheated oven and bake for about 20-25 minutes, or until the pastries are wonderfully puffy and achieve a deep golden-brown hue. Once baked, remove them from the oven. For an extra touch of elegance and sweetness, you can dust them lightly with powdered sugar before serving. Enjoy them warm, as they are truly best fresh from the oven!
Expert Tips for Vegan Pain Au Chocolat Perfection
1. Temperature is Your Best Friend
Maintaining cold temperatures is the golden rule for flaky croissants. Ensure your vegan butter is ice-cold at the start and stays cold throughout the lamination process. If the dough or butter becomes too soft or sticky at any point, don’t hesitate to pop it back into the refrigerator or freezer for 10-20 minutes until firm again. This prevents the butter from melting into the dough, which would result in a dense, rather than flaky, pastry.
2. The Right Vegan Butter Matters
Not all vegan butters are created equal. For lamination, choose a high-quality, stick-style vegan butter that is firm and contains a good fat content, similar to traditional dairy butter. Brands designed for baking often work best. Avoid softer, tub-style margarines, as they won’t hold up to the rolling and folding required for flaky layers.
3. Don’t Overwork the Dough
When mixing the initial dough and during the rolling phases, handle the dough gently. Overworking the dough develops too much gluten, which can make your croissants tough instead of tender and flaky. Embrace the “rugged” texture of the initial dough; those butter chunks are what we want!
4. Flouring Your Surface
Lightly flour your work surface and rolling pin to prevent sticking, but avoid using excessive flour. Too much flour can dry out the dough and make it difficult to laminate properly. Use just enough to ensure the dough moves smoothly.
5. Consistent Rolling Pressure
When rolling the dough, apply even pressure across the surface. This helps create consistent layers and prevents thin spots or tears. Roll from the center outwards, turning the dough frequently.
6. Overnight Pain Au Chocolat (Make-Ahead Method)
For ultimate convenience, you can prepare the dough in advance. After completing all the folds and the final chill (before shaping), wrap the dough tightly and refrigerate it overnight (up to 12-18 hours). The next morning, proceed with the recipe as written. Because the dough will be very cold, the shaped croissants may require a slightly longer proofing time at room temperature, possibly around 2 hours, to achieve their full volume before baking.
7. Optimal Chocolate Choices
Traditional pain au chocolat often uses “chocolate batons” (batons de chocolat), which are specific sticks of baking chocolate. While these are ideal, finding vegan batons can be challenging. High-quality vegan chocolate chips work wonderfully as a readily available alternative. Alternatively, you can use your favorite vegan chocolate bars, chopped into small sticks or chunks. The key is to use a good quality chocolate that melts beautifully.

Frequently Asked Questions About Vegan Pain Au Chocolat
What kind of chocolate should I use?
While chocolate batons (batons de chocolat) are traditionally used in chocolate croissants, sourcing vegan-friendly ones can sometimes be difficult. Fear not, as readily available vegan chocolate chips work wonderfully and melt beautifully within the pastry. Another excellent option is to use your favorite vegan chocolate bars, cut into small, even pieces or sticks. The most important thing is to choose a high-quality vegan chocolate that you enjoy eating on its own, as its flavor will shine through in your finished pain au chocolat.
How can I make overnight vegan pain au chocolat?
Making them overnight is a fantastic way to enjoy fresh pastries in the morning with less effort. After completing the final folding of the dough and wrapping it tightly in plastic, simply leave it to chill in the refrigerator overnight. The next day, continue the recipe as written from the shaping stage. Since the dough will be very cold, allow the shaped croissants a bit more time to rise at room temperature – typically around 2 hours instead of 1 hour – to ensure they proof adequately before baking.
Can vegan pain au chocolat be made gluten-free?
Crafting gluten-free croissants that achieve the same delicate flakiness and buttery texture as their wheat-based counterparts is notoriously challenging. The gluten in flour is what creates the elastic network necessary for those distinct, airy layers. While it’s possible to experiment with gluten-free flour blends, I haven’t yet found a method that yields truly comparable results for laminated pastries like croissants. Therefore, this specific recipe is designed for all-purpose flour. If you do attempt a gluten-free version, be prepared for a different texture.
How long do vegan pain au chocolat last, and how should I store them?
These pastries are undeniably best enjoyed fresh, ideally warm from the oven on the day they are baked. However, they can be stored at room temperature in an airtight container for up to 3 days. To reheat and refresh them, pop them in a preheated oven at 350°F (175°C) for a few minutes until warmed through and crispy. You can also freeze unbaked shaped croissants on a baking sheet until solid, then transfer them to a freezer-safe bag for up to 2-3 weeks. When ready to bake, transfer them directly from the freezer to a parchment-lined baking sheet, allow them to proof at room temperature for about 3-4 hours (as they will be very cold), then bake as directed. Baked pain au chocolat can also be frozen for later enjoyment; simply thaw and reheat.
Want More Bakery Favorites Made Vegan?
If you’ve enjoyed the journey of creating these exquisite vegan pain au chocolat, you’re in for a treat! The world of plant-based baking is vast and incredibly rewarding. Explore more of our beloved bakery classics, reimagined without dairy or eggs, and discover new favorites to add to your repertoire:
- Vegan Boston Cream Donuts: Indulge in classic, cream-filled donuts with a rich chocolate glaze.
- Vegan Coffee Cake: A moist, tender cake topped with a delectable streusel, perfect for any time of day.
- Vegan Blueberry Muffins: Fluffy and bursting with juicy blueberries, a timeless breakfast staple.
- Vegan Chocolate Cake: A rich, decadent chocolate cake that’s surprisingly easy to make and utterly satisfying.

Vegan Pain Au Chocolat
Vegan Pain Au Chocolat are a dream come true and not too difficult to make at home. There is nothing better than a warm freshly baked chocolate croissant!
Prep Time: 4 hrs 30 mins
Cook Time: 25 mins
Total Time: 4 hrs 55 mins
Servings: 16 croissants
Pin Recipe
Leave a Comment
Ingredients
Vegan Pain Au Chocolat
- 4 cups all-purpose flour
- 1/3 cup granulated sugar
- 2 packets instant yeast (4 teaspoons)
- 1 1/2 teaspoons salt
- 1 1/4 cups vegan butter (sticks work best), cold and sliced
- 1 cup soy milk (or other plant-based milk)
- 10 ounce bag vegan chocolate chips (or chocolate batons, chopped chocolate bars)
Vegan Egg Wash
- 1 tablespoon pure maple syrup
- 2 tablespoons soy milk
Instructions
- Add the flour, sugar, yeast, and salt to a large bowl and whisk to combine thoroughly.
- Slice the cold vegan butter into thin slices (about 1/8 inch thick) and gently toss them into the dry flour mixture using a spatula. Do not use a mixer or your hands too much; the goal is to coat the butter, not break it up or melt it.
- Pour in the milk and stir gently until a stiff, rugged dough with visible chunks of butter forms. Again, avoid overworking or melting the butter.
- Wrap the dough tightly in plastic wrap (or an eco-friendly alternative) and chill in the refrigerator for 1 hour.
- After chilling, remove the dough from the refrigerator and place it on a lightly floured surface. Roll the dough into a long rectangle. It will be uneven at first, but will smooth out as you proceed.
- Fold the dough into thirds, like a letter. Roll it out into a large rectangle, then turn the dough 90 degrees. Repeat this rolling and folding process 5 more times. You should see large streaks of butter, and the dough should become smooth. If the butter starts to soften, return the dough to the refrigerator or freezer until firm.
- Wrap the dough tightly again in plastic wrap and chill in the refrigerator for another hour.
- Divide the dough in half to make it easier to work with. Roll one half into a large rectangle (approximately 20 inches long, 10 inches wide, and 1/8 inch thick). Use a pizza cutter or sharp knife to trim any uneven edges, creating a clean rectangle.
- Cut the dough into about 16 smaller rectangles.
- Line vegan chocolate chips (or batons/chopped chocolate) on the bottom edge of a small rectangle, closest to you. Carefully roll the dough up around the chocolate. You can add another layer of chocolate about 1.5 inches from the other side as you roll for extra richness. Tuck the seam underneath the dough to secure it.
- Place the shaped pastries on a parchment-lined baking pan, spacing them apart. Cover loosely and allow them to rise at room temperature for 1 hour.
- While the pastries are proofing, preheat your oven to 375°F (190°C). After the proofing time, place the pan of pastries in the refrigerator or freezer for 30 minutes to chill before baking.
- In a small bowl, stir together the maple syrup and soy milk for your vegan egg wash.
- Gently brush the syrup/milk mixture onto the tops of the pain au chocolat. Place the pan in the center rack of the preheated oven and bake for 20-25 minutes, or until they are puffed up and golden brown.
- Remove from the oven, allow to cool slightly, and dust with powdered sugar before serving. Enjoy warm!
Notes
- Overnight Pain Au Chocolat: For convenience, after the final folding of the dough (when you would normally refrigerate it for an hour), you can refrigerate it overnight instead. The next morning, continue with the recipe as written. Once shaped, the croissants may require a little extra time to rise at room temperature (about 2 hours) since they will be very cold.
- Chocolate Options: Chocolate batons are often preferred for their shape and even melt, but vegan versions can be hard to find. Vegan chocolate chips work excellently and are widely available. You can also use good quality vegan chocolate bars, cut into small pieces or sticks.
- Storage: These pastries are best fresh and warm. They will keep for up to 3 days at room temperature in an airtight container. You can also freeze unbaked shaped croissants or fully baked ones. Reheat baked croissants in a preheated oven to restore crispness.
- Cold Butter is Key: Always ensure your vegan butter is very cold when you start and maintain its cold temperature throughout the laminating process. If it softens, chill the dough again immediately. This is crucial for achieving distinct, flaky layers.
Nutrition
Serving: 1 of 16 croissants
Calories: 333kcal
Carbohydrates: 40g
Protein: 5g
Fat: 18g
Saturated Fat: 7g
Polyunsaturated Fat: 3g
Monounsaturated Fat: 5g
Trans Fat: 0.1g
Sodium: 341mg
Potassium: 66mg
Fiber: 2g
Sugar: 14g
Vitamin A: 740IU
Vitamin C: 1mg
Calcium: 53mg
Iron: 3mg
Course: Breakfast
Cuisine: French
Author: Nora Taylor
Did you make this recipe?
Mention @nora_cooks_vegan_ or tag #noracooks!