

Welcome to the ultimate guide for crafting exquisite, bakery-style **Vegan Croissants** right in your own kitchen! Forget the daunting reputation of this classic French pastry; we’re about to demystify the art of laminated dough, transforming a once complex endeavor into an incredibly rewarding and home-baker-friendly adventure. Prepare to impress yourself and everyone you share these buttery, flaky, and unbelievably soft croissants with – all completely plant-based!

For many, the idea of making **homemade croissants** conjures images of endless hours, intricate techniques, and a fridge full of butter. While traditional croissants are indeed a labor of love, requiring a masterful touch with butter and a precisely laminated dough, this **vegan croissant recipe** simplifies the process without sacrificing any of the iconic flakiness or rich, buttery flavor. My philosophy for baking often leans towards simplicity – think my one-bowl vegan chocolate cake! – but croissants, by their very nature, demand a little more attention. However, I’ve streamlined this recipe significantly, allowing you to achieve remarkable results in less than a day, a far cry from the multi-day processes often found in traditional recipes.
Just like perfecting my Vegan Eclairs and Cream Puffs, I rigorously tested this **vegan croissants recipe** until each pastry was big, fluffy, and undeniably buttery. This comprehensive guide will walk you through every detailed step, offering abundant tips and tricks to ensure your success with this seemingly challenging pastry. You’ll be delighted to find that the ingredient list is surprisingly short, and no specialized equipment is required, making this an accessible project for any enthusiastic home baker.
The journey to these delightful **plant-based croissants** unfolds with a straightforward sequence:
- Prepare and allow the dough to rest, giving the yeast time to work its magic.
- Skillfully roll and fold the dough – the lamination process that creates those incredible layers.
- Precisely slice the dough into elegant triangles.
- Artfully roll these triangles into classic crescent shapes.
- Finally, bake to golden perfection and savor every tender bite!
Once you master this **vegan croissant recipe**, you’ll find yourself effortlessly whipping up batches for lazy weekend breakfasts, elegant brunches, or simply as a luxurious treat. Imagine waking up to the irresistible aroma of freshly baked, warm, and buttery croissants. The best part? You can even prepare the dough the night before, ready to be baked fresh the next morning, making those spontaneous pastry cravings a delightful reality.

Essential Ingredients for Flawless Vegan Croissants (with Notes on Substitutions)
Creating magnificent **flaky vegan croissants** starts with a handful of quality ingredients. Each component plays a crucial role in achieving the desired texture, flavor, and rise. Here’s what you’ll need:
- All-Purpose Flour: This is my preferred flour for these croissants, as it provides a robust structure and a wonderfully chewy yet tender texture, reminiscent of traditional croissants. While some French bakeries might opt for pastry flour for a more delicate crumb or bread flour for extra sturdiness, all-purpose flour strikes the perfect balance. If substituting, bread flour (higher protein) will yield a chewier croissant, while pastry flour (lower protein) will result in a more delicate, less chewy pastry.
- Granulated Sugar: Essential not just for sweetness, but also for feeding the yeast, contributing to the dough’s fermentation and beautiful golden-brown crust.
- Instant Dry Yeast: A non-negotiable ingredient for achieving those airy, giant, and fluffy croissants. As the yeast ferments, it produces carbon dioxide, causing the dough to rise dramatically and develop its signature internal structure. This recipe is designed for instant dry yeast, which can be added directly to the dry ingredients without prior proofing. Active dry yeast can also be used; simply activate it in a portion of the warm plant milk before combining with other ingredients, ensuring it’s vibrant and foamy.
- Salt: Crucial for enhancing the flavor of the dough, balancing the sweetness, and controlling the yeast’s activity, contributing to a well-developed crumb.
- Cold Vegan Butter: The cornerstone of **buttery vegan croissants**. The quality and temperature of your vegan butter are paramount for successful lamination. I’ve consistently had the best results using vegan butter sticks (like Miyoko’s Kitchen Cultured Vegan Butter) due to their higher fat content and firmer consistency when cold, which is vital for creating distinct layers. Soft-spread vegan butters often contain more water and less fat, making them less suitable for the lamination process. Ensure your butter is as cold as possible throughout the process.
- Unsweetened Soy Milk: Or any other unsweetened plant milk of your choice. Plant milk serves as the liquid component, hydrating the flour and activating the yeast. Ensure it’s cold to help keep the overall dough temperature low, which is crucial for working with the cold vegan butter. Almond milk or oat milk are excellent alternatives.
- Maple Syrup: Used in combination with a little soy milk to create a simple yet effective **vegan egg wash**. Brushing this mixture over the crescent rolls before baking helps them achieve a gorgeous, deep golden-brown hue and a slightly glossy finish, enhancing their bakery-style appeal.
Step-by-Step Guide: How to Make Bakery-Quality Vegan Croissants at Home
While the full printable recipe with precise measurements can be found below in the recipe card, let’s dive into the detailed steps for creating these delightful **dairy-free croissants**.
Step 1: Preparing the Dough – The Foundation of Flakiness
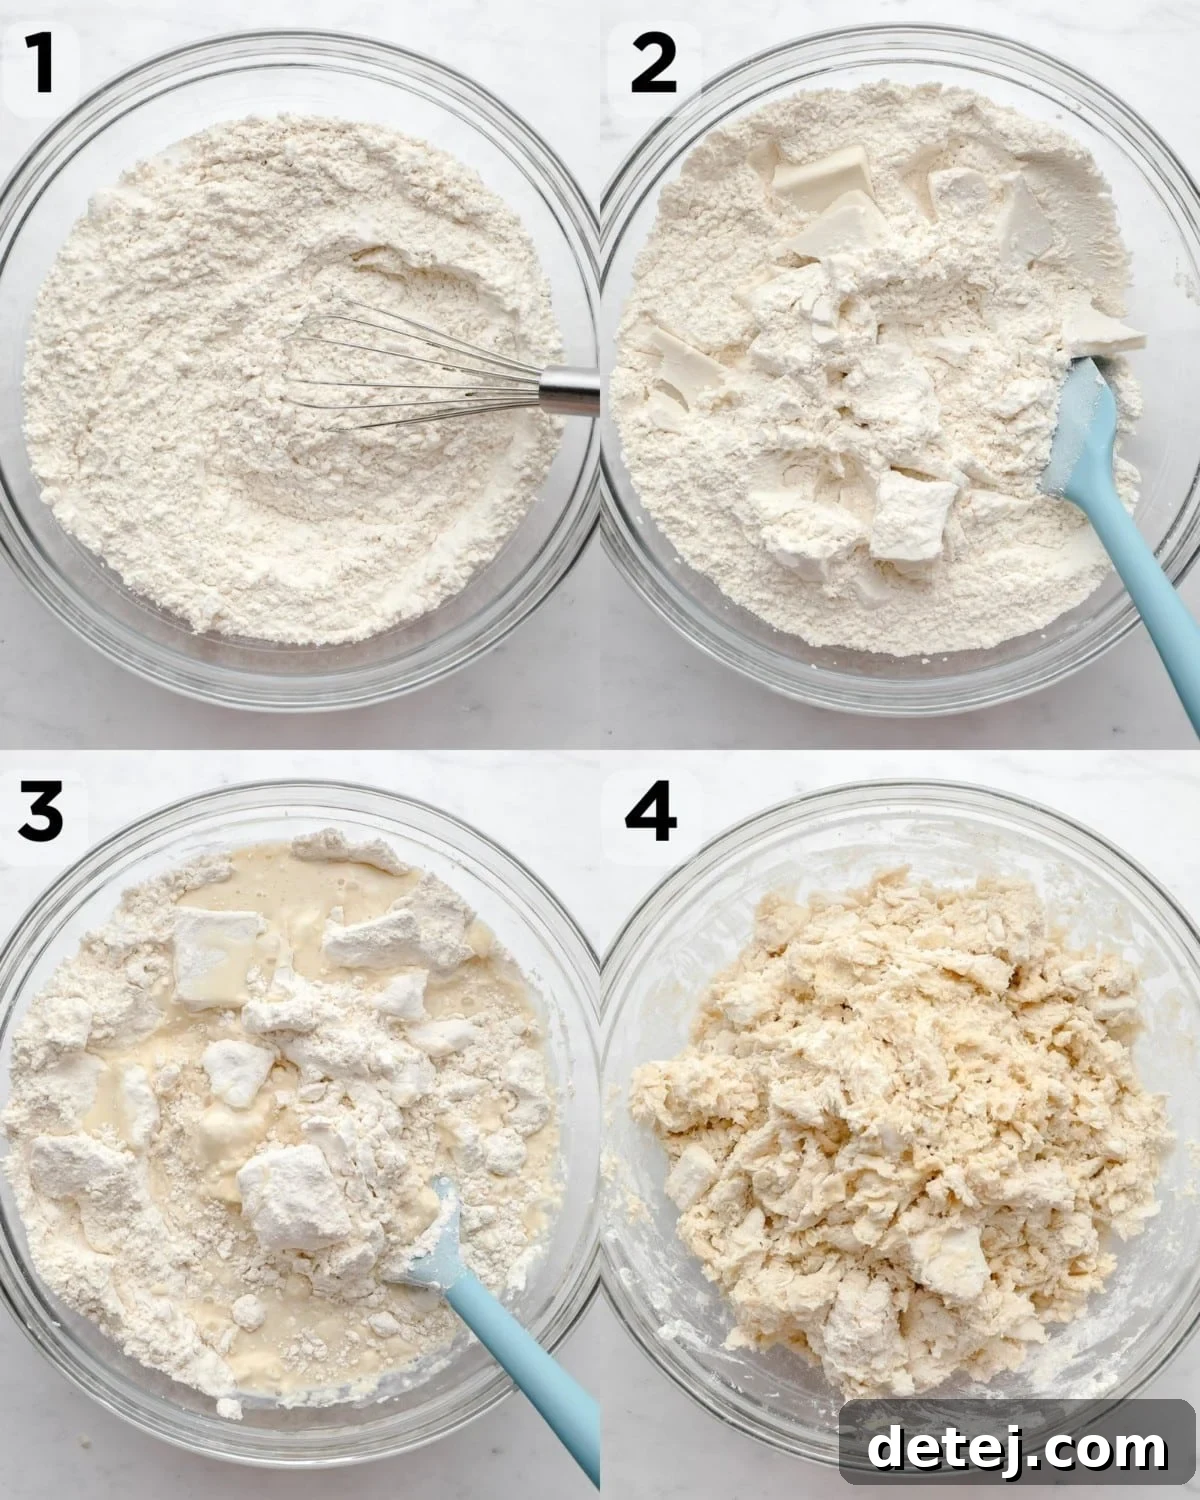
In a large mixing bowl, combine the all-purpose flour, granulated sugar, instant dry yeast, and salt. Whisk these dry ingredients thoroughly to ensure an even distribution. Next, take your very cold vegan butter sticks and slice them into thin, approximately 1/8-inch thick pieces. Gently toss these cold butter slices into the dry mixture using a spatula. The goal here is not to incorporate the butter fully, but to coat it with flour and break it into slightly smaller chunks, maintaining its cold temperature. Avoid overworking it with your hands or a mixer, as this will melt the butter and hinder lamination. Pour in the cold soy milk and stir gently with the spatula until a rugged, stiff dough forms. You should see visible chunks and streaks of butter throughout the dough. The less you handle the dough, the better, to keep the butter firm.
Step 2: Chilling and Lamination – Unlocking Those Signature Layers
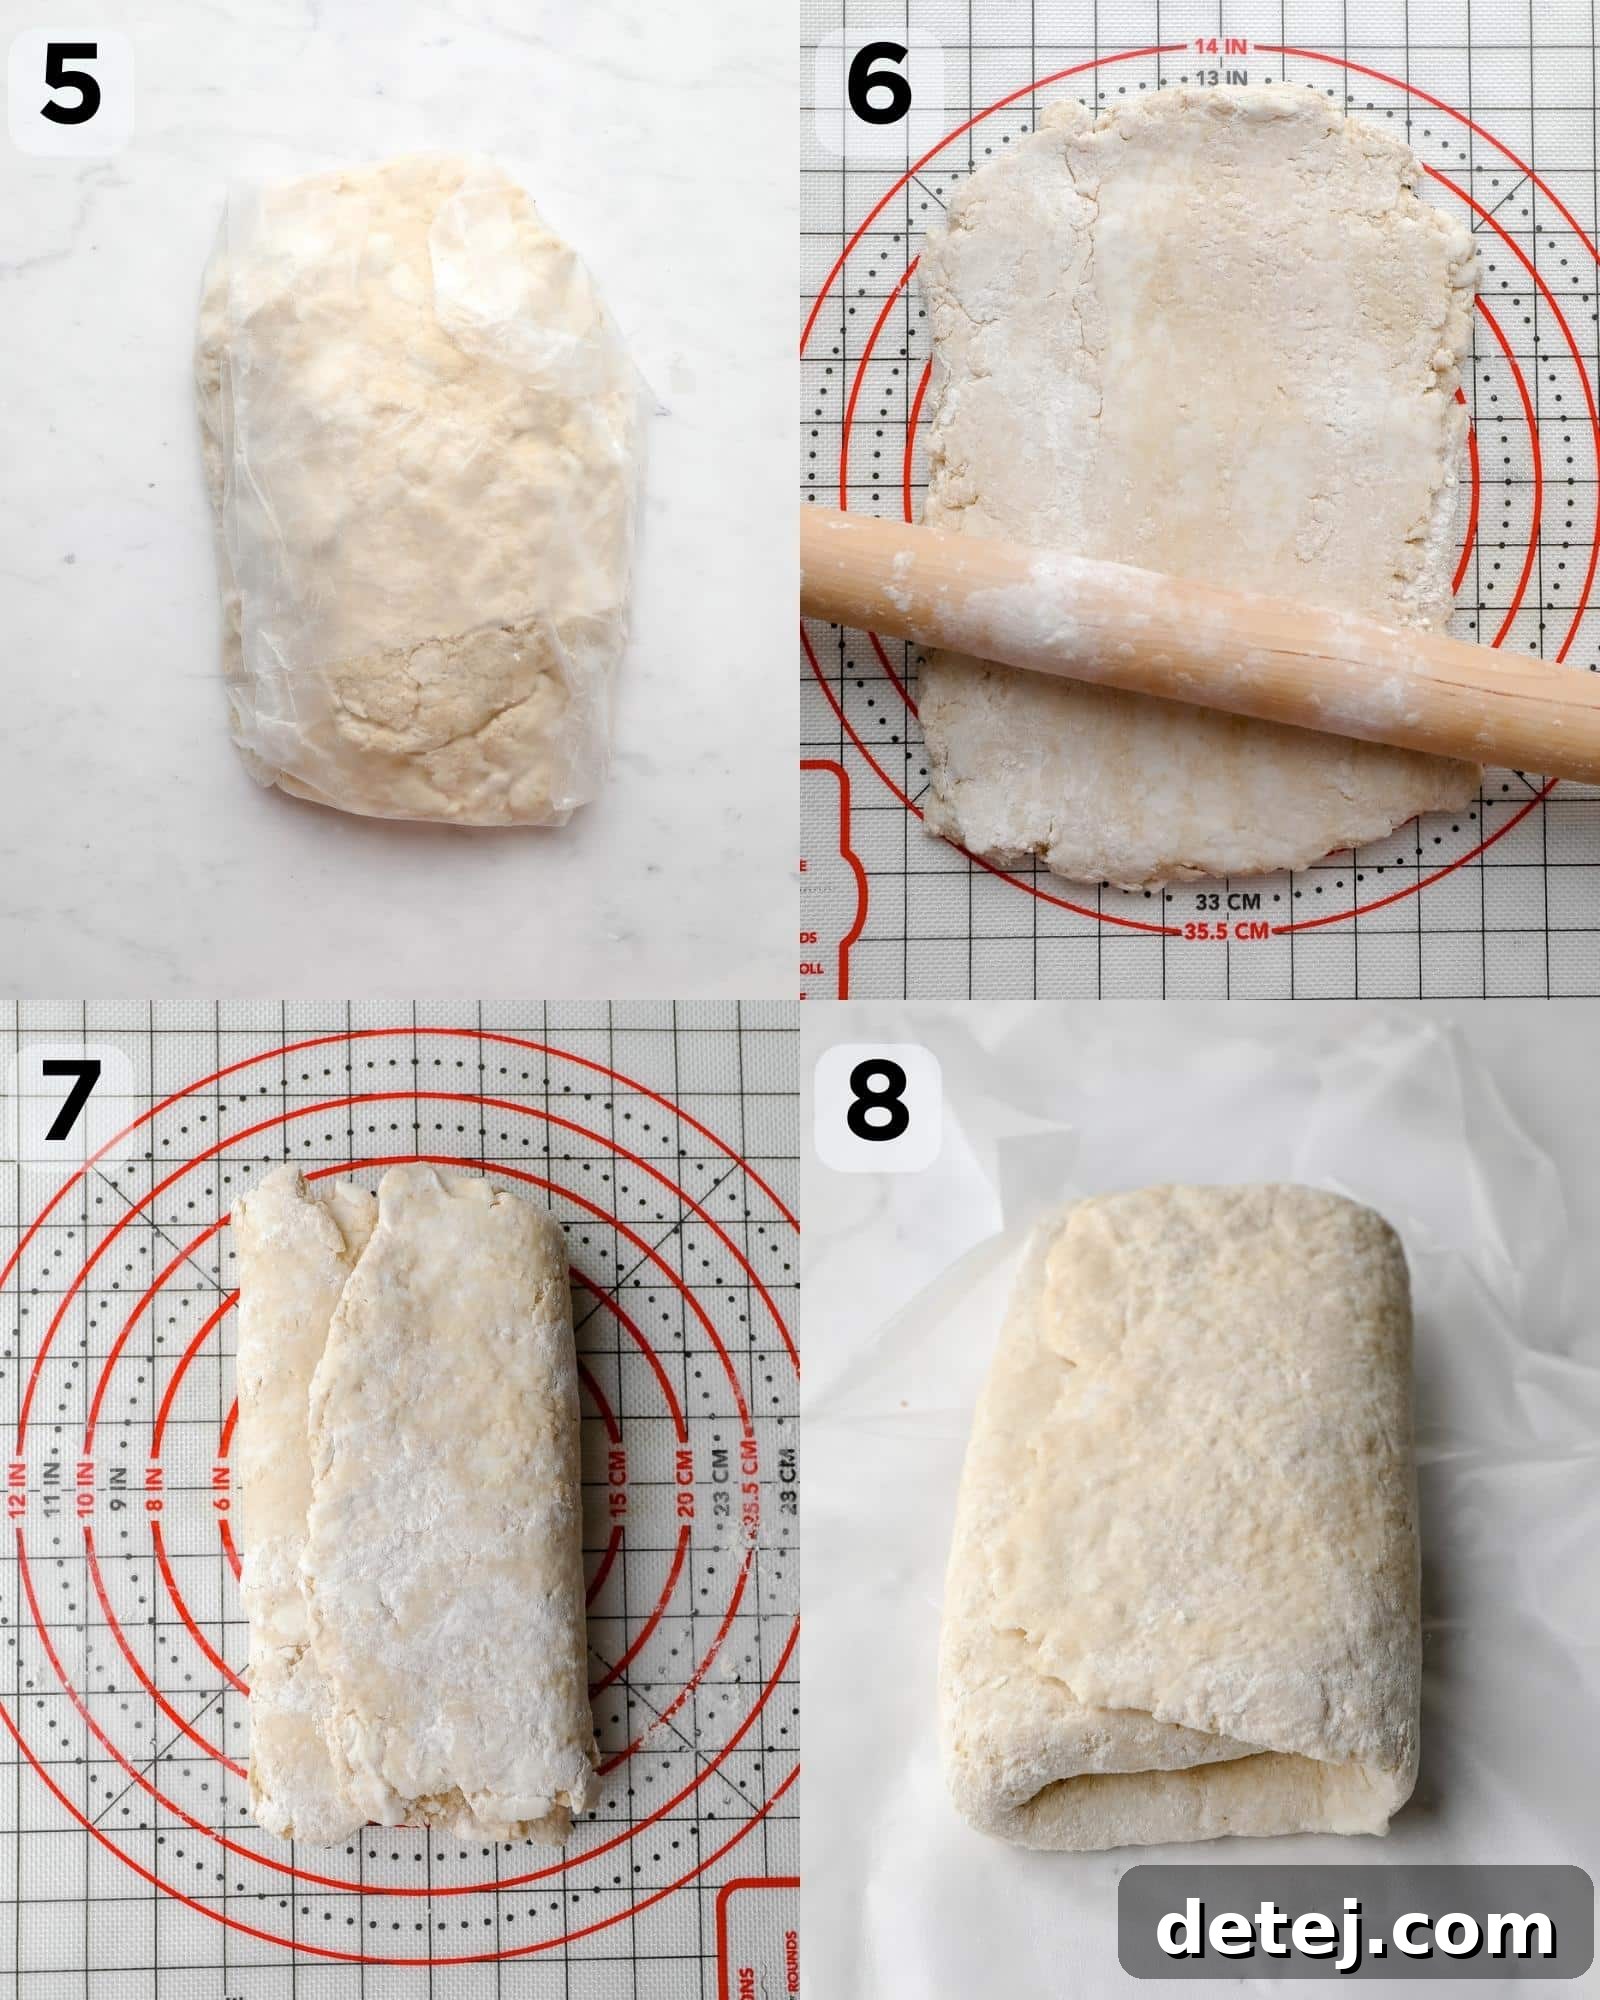
Once your dough is formed, wrap it tightly in plastic wrap (or an eco-friendly alternative) and place it in the refrigerator for at least 1 hour. This initial chill is crucial for firming up the butter and relaxing the gluten. After chilling, transfer the dough to a lightly floured surface. Roll it out into a large rectangle. Don’t worry if it’s not perfectly smooth at this stage; the subsequent folds will refine it.
Now, we begin the lamination process – the magic that creates hundreds of delicate layers. Fold the dough into thirds, much like you would fold a letter. This is your first “turn.” After folding, rotate the dough 90 degrees. Roll it out again into a large rectangle, then repeat the folding process. You will repeat this rolling, folding, and rotating sequence a total of 5 more times. As you work, you will notice the dough becoming smoother, but crucially, you should still see distinct, large streaks of cold vegan butter within the layers. This is exactly what you want! If at any point the butter starts to soften and become difficult to work with, immediately return the dough to the refrigerator (or even the freezer for a few minutes) until it’s firm again. Patience is key here. After the final fold, wrap the dough tightly once more and chill it in the refrigerator for another hour. This rest allows the gluten to relax and the butter to firm up completely before shaping.
Step 3: Shaping and Baking – Bringing Your Croissants to Life
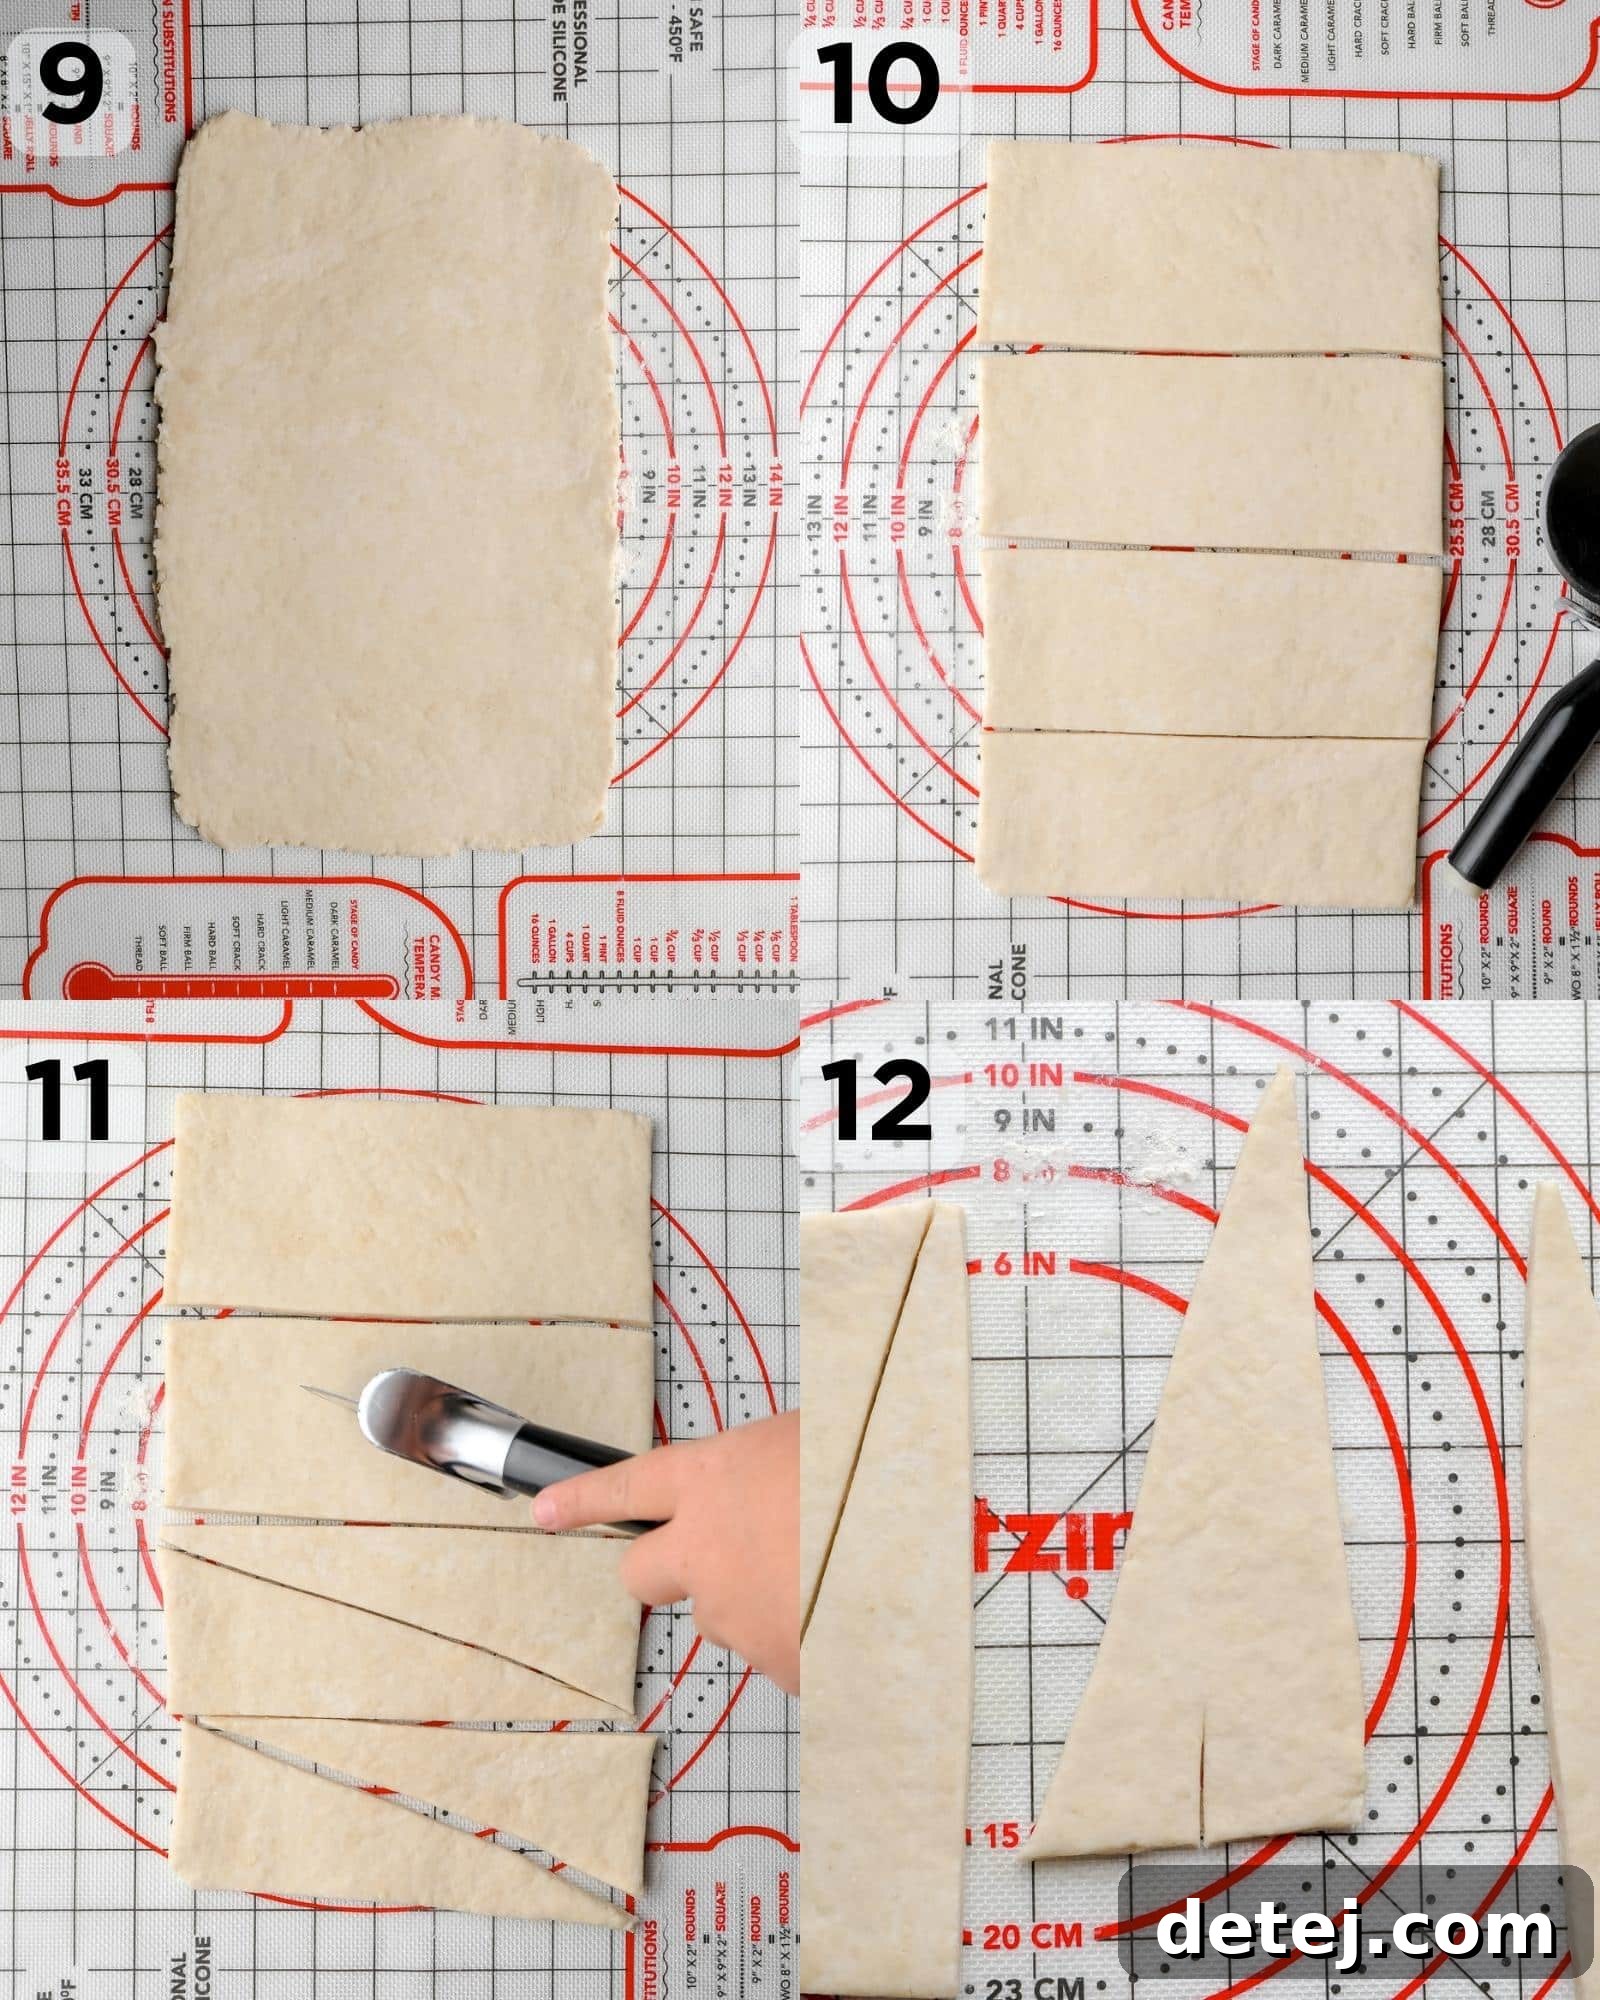
Retrieve your well-chilled, laminated dough. Divide it in half to make it more manageable. Work with one half at a time, keeping the other half refrigerated. On a lightly floured surface, roll one half of the dough into a large rectangle, aiming for dimensions of approximately 20 inches long, 10 inches wide, and 1/8 inch thick. Use a pizza cutter or a sharp knife to trim away any uneven edges, creating a neat, clean rectangle.
Now, carefully slice the large rectangle into smaller rectangles. From each of these smaller rectangles, slice them diagonally to form skinny, long triangles. This is the classic shape for croissants. At the wide end of each triangle, cut a small, shallow slit. This slit will help in the rolling process and give your croissants their iconic curved shape.
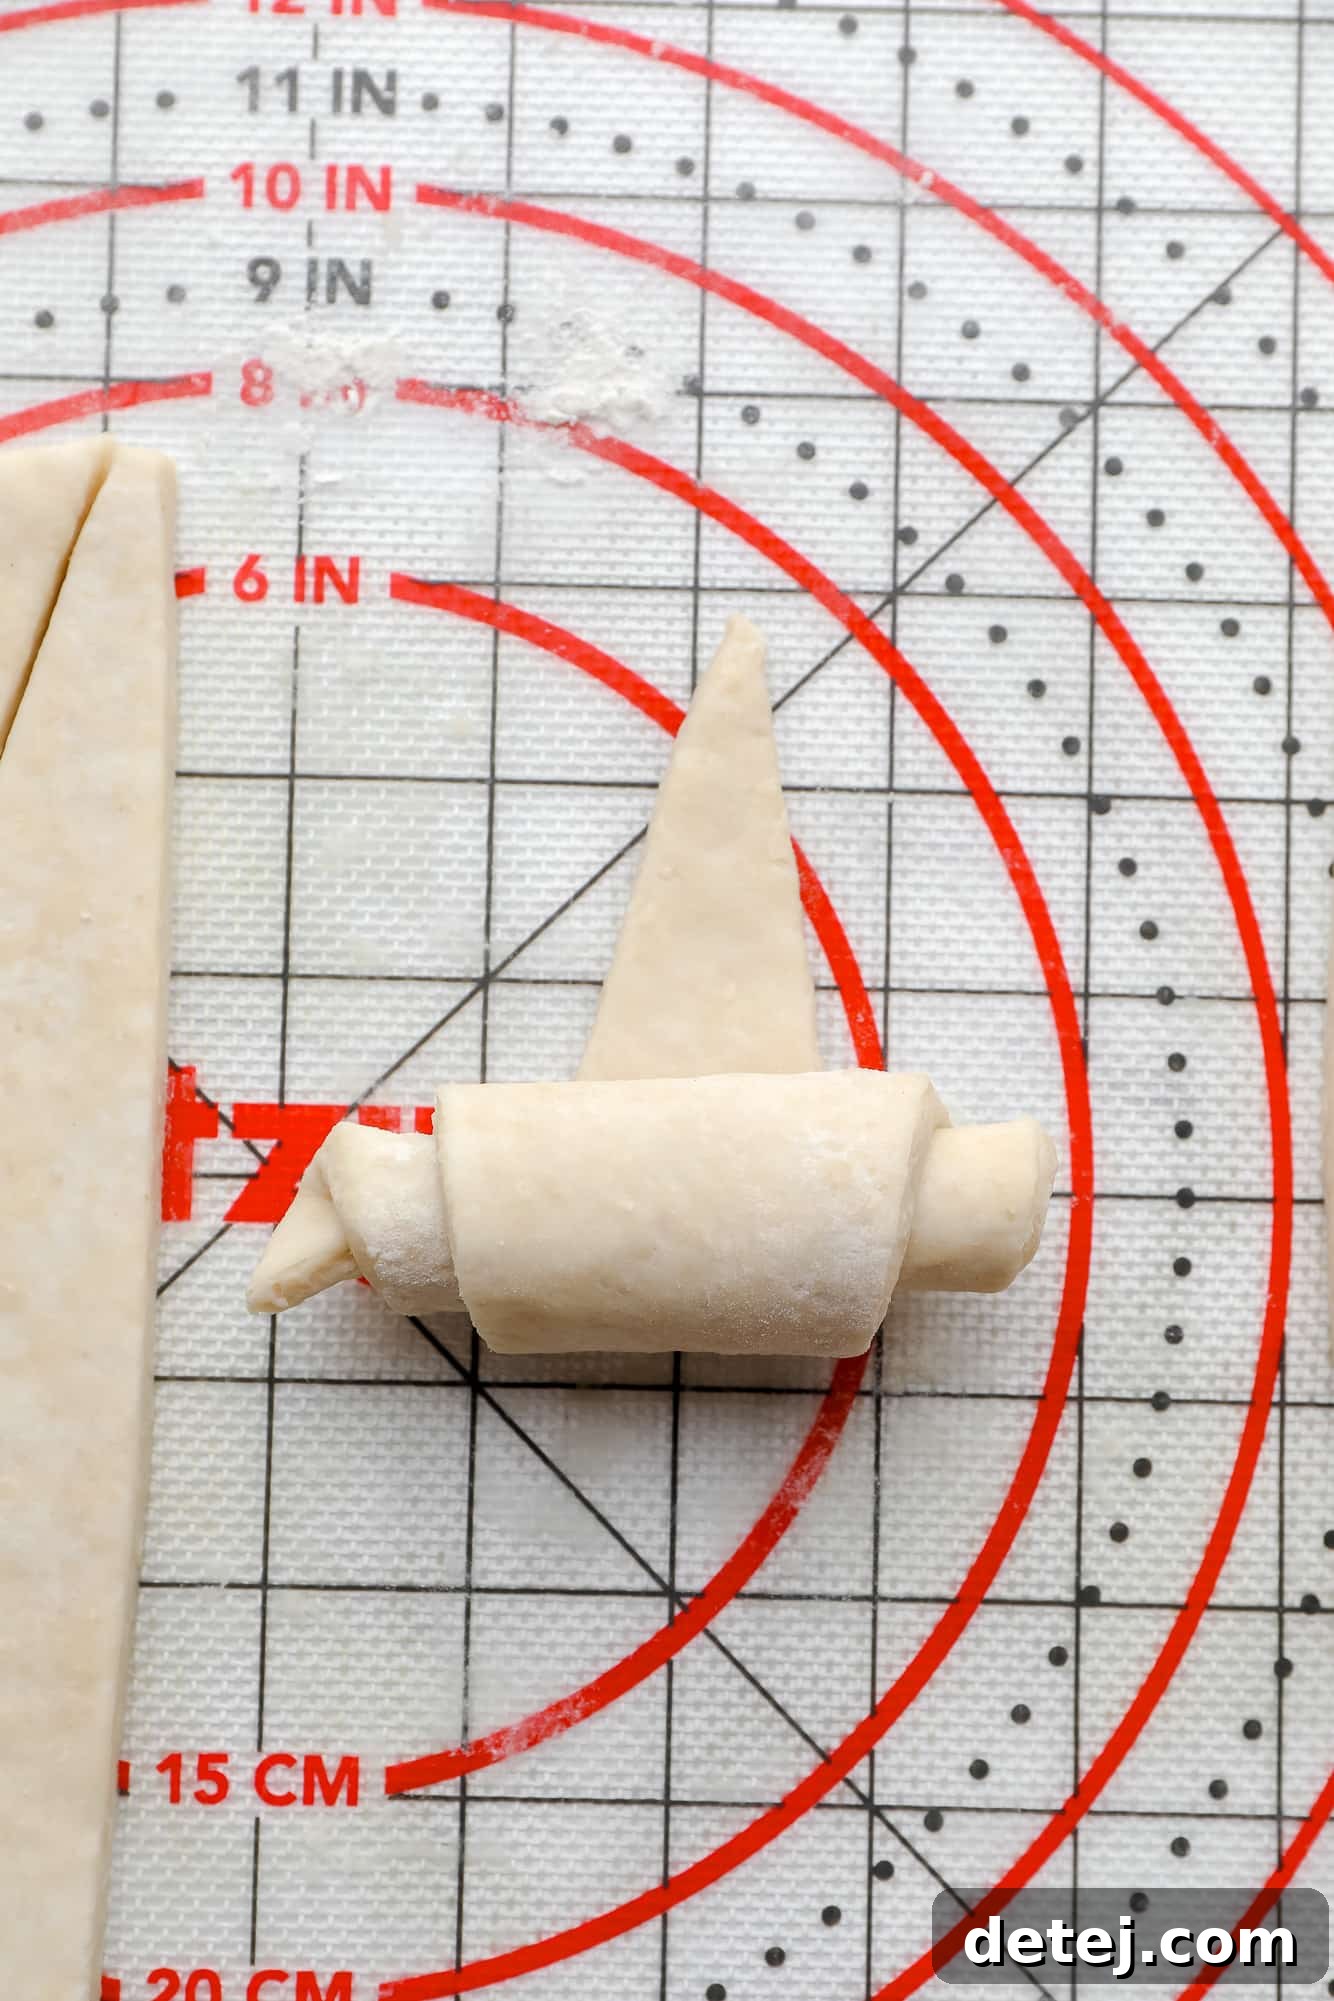
Starting from the wide, slit end, tightly roll each triangle into a crescent shape. Ensure the tip of the triangle is tucked neatly underneath the rolled portion, securing the shape. These tight rolls are essential for creating the beautiful layers within the finished croissant.
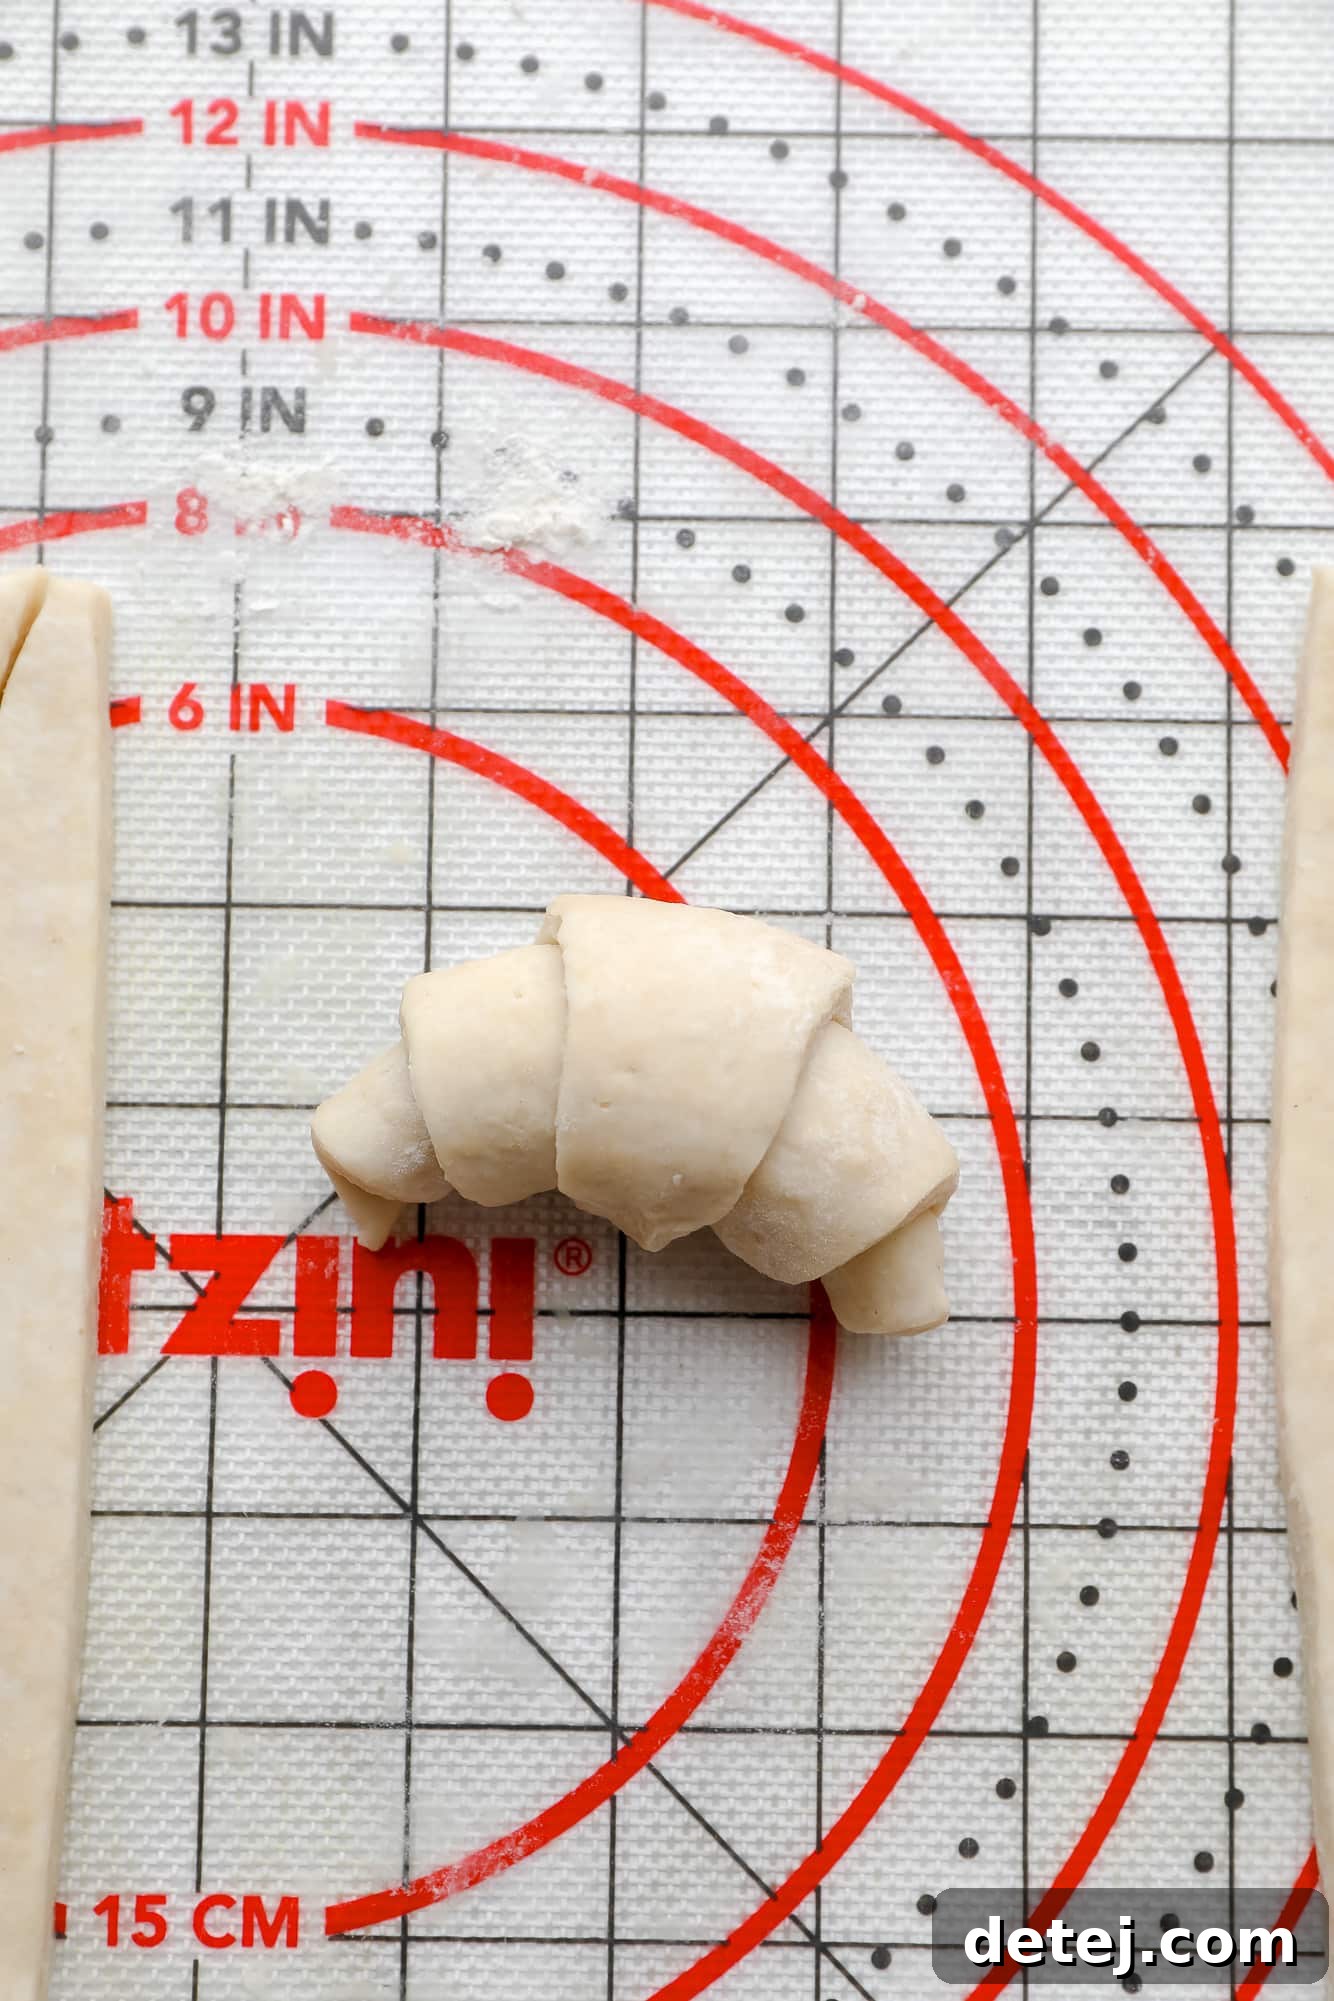
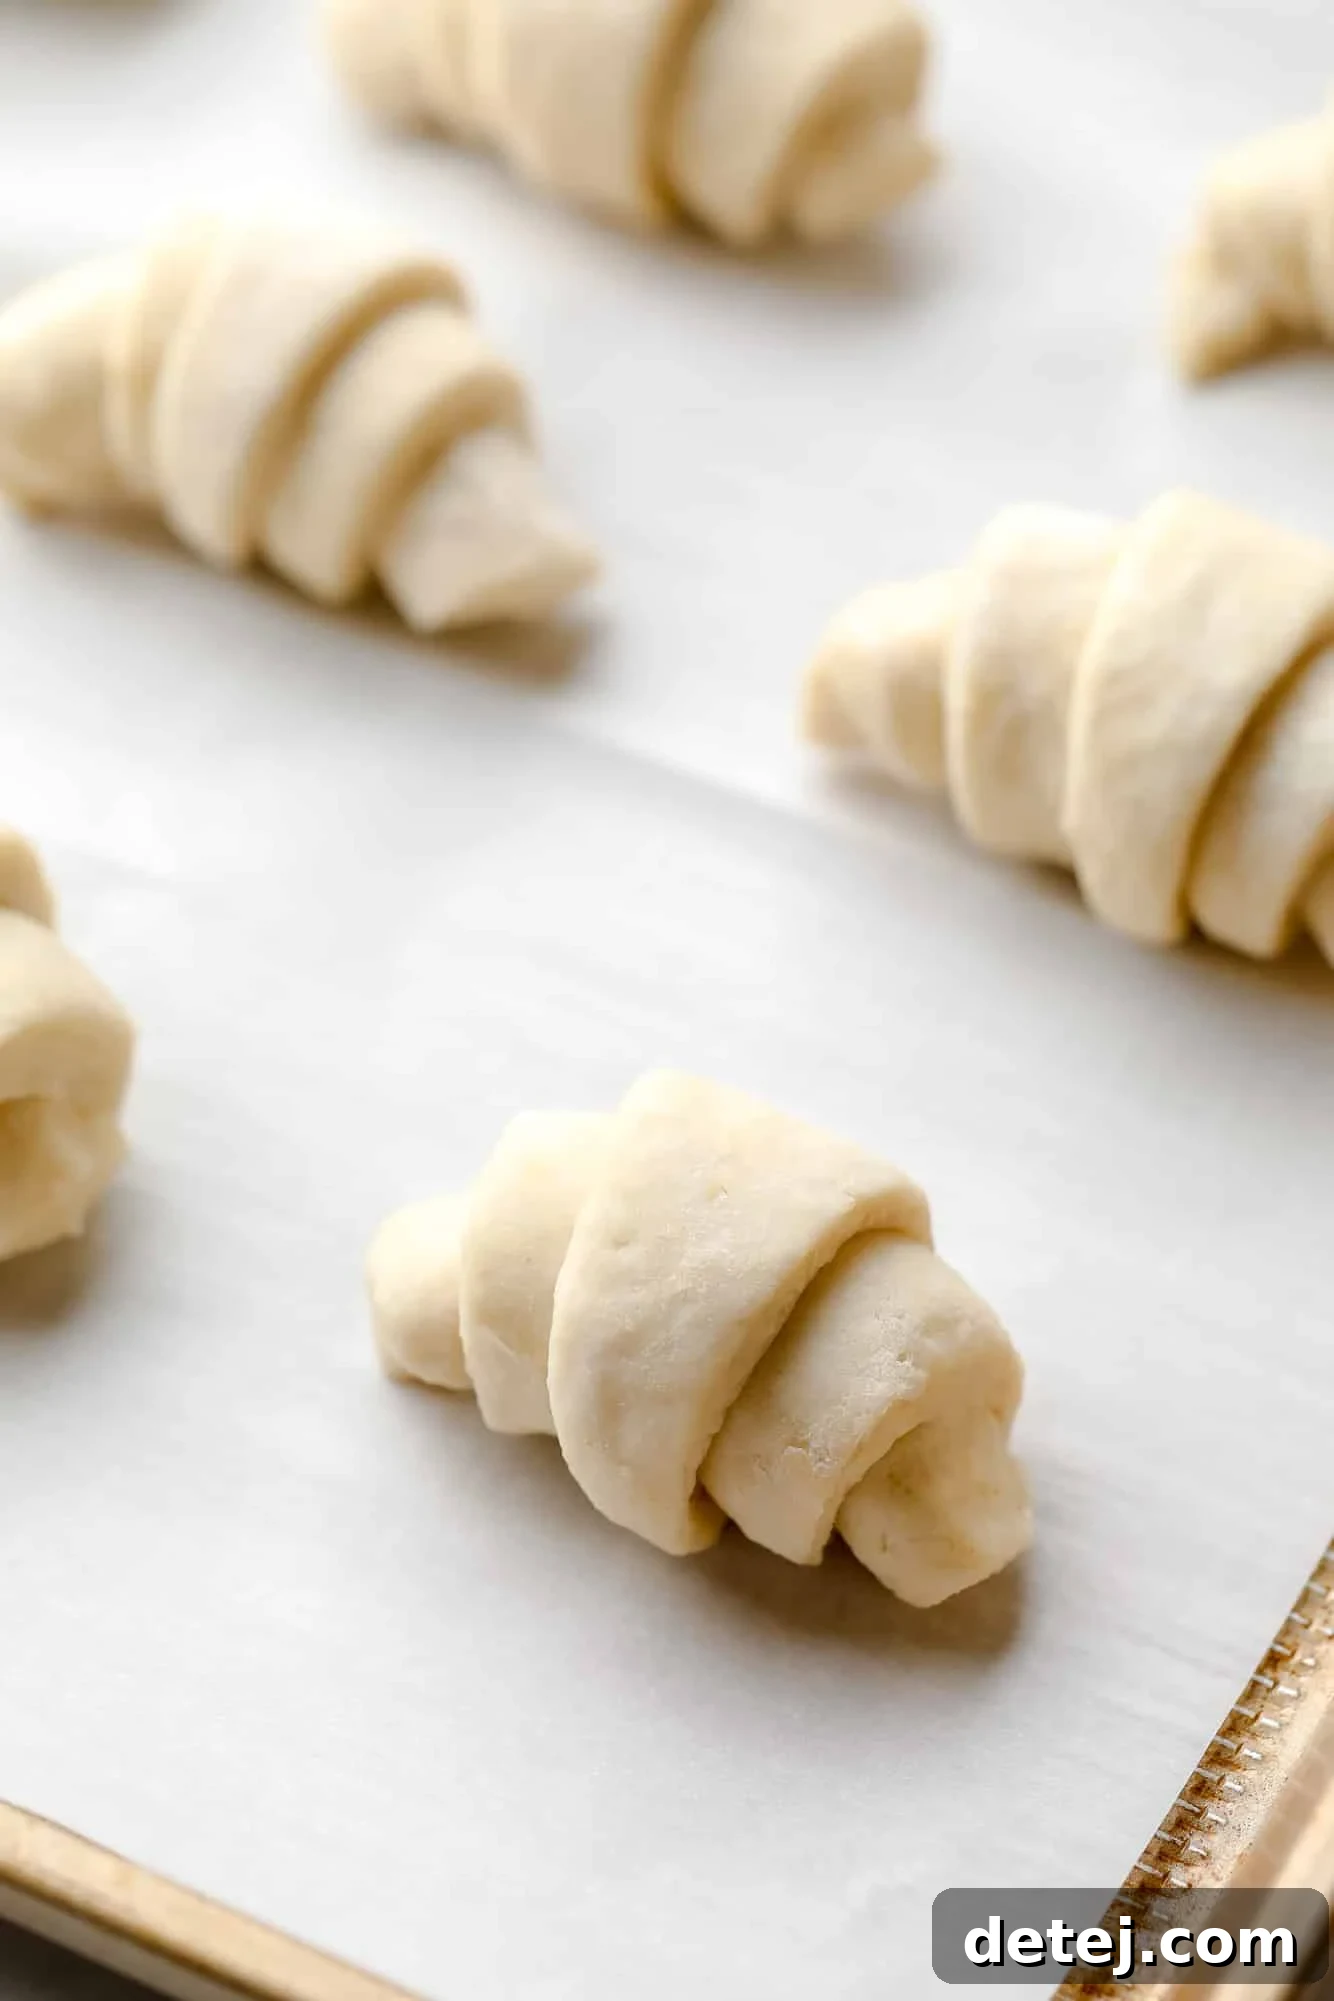
Transfer each beautifully shaped crescent roll to a baking sheet lined with parchment paper, ensuring there’s enough space between them for expansion. Loosely cover the baking sheet with plastic wrap and set it aside in a warm, draft-free place to rise for about 1 hour at room temperature. After this rise, place the croissants in the freezer or refrigerator for 30 minutes. This helps firm up the butter again, ensuring optimal flakiness during baking. While the croissants are chilling, preheat your oven to 375 degrees F (190 degrees C).
In a small bowl, whisk together the maple syrup and the remaining soy milk to create your vegan egg wash. Gently brush this syrup-milk mixture over the top of each crescent roll. This will give them that irresistible golden sheen. Place the baking sheet in the center rack of your preheated oven and bake for 20-25 minutes, or until the croissants are beautifully puffy, deeply golden brown, and delightfully crisp. Remove them from the oven and try to resist digging in immediately (it’s tough!). Allow them to cool for a few minutes before enjoying them warm and fresh from the oven.
Planning Ahead: Overnight Vegan Croissants for Morning Bliss
Imagine waking up to the delightful aroma of freshly baked croissants without the morning rush! This recipe easily accommodates an overnight proofing schedule. After you have completed all the rolling and folding (the lamination process, just before the final 1-hour chill), instead of chilling for an hour, wrap the dough very tightly in plastic wrap and place it in the refrigerator overnight. The next morning, simply retrieve the dough from the fridge and continue with the recipe as written, dividing, rolling, shaping, and allowing them to rise. Due to the prolonged cold proof, the shaped crescent rolls may require a little extra time to rise at room temperature – typically around 2 hours – before baking. This extended rise time will ensure they achieve maximum puffiness and flakiness, making your morning an absolute treat.
Expert Tips for Crafting Perfect Vegan Croissants
While this recipe simplifies the process, a few key considerations will elevate your **homemade vegan croissants** from good to extraordinary:
- Stick to the Recipe: Croissant baking is a delicate balance. Try to avoid making too many substitutions, especially for flour and vegan butter, as this can significantly impact the final texture, flakiness, and rise of your croissants.
- Temperature is Everything: The cardinal rule of croissant making is to keep your vegan butter as cold as possible. Cold butter melts slowly during baking, creating steam that separates the dough layers into the flaky, melt-in-your-mouth pastry we all adore. If the butter becomes too warm and starts to ooze out of the dough while you’re rolling or folding, immediately return the dough to the refrigerator or even the freezer for a few minutes until it’s firm and chilled again.
- Gentle Handling: When mixing the dough and especially during lamination, handle the dough gently. Overworking can develop the gluten too much, making the dough tough, and can also warm up the butter, which we want to avoid.
- Patience with the Rise: The time it takes for your croissants to rise (proof) will vary significantly depending on the ambient temperature of your kitchen. In colder environments, the dough will rise more slowly, potentially requiring a longer proofing time. Conversely, a warmer kitchen will speed up the rise. Look for visual cues – the croissants should look visibly puffy and airy – rather than strictly adhering to a timer.
- Sharp Tools: Use a sharp knife or a pizza cutter to trim and slice the dough. Clean cuts prevent the layers from sealing together, which is crucial for achieving distinct flakiness.

Frequently Asked Questions About Vegan Croissants
I’ve primarily tested this recipe for **vegan croissants** with all-purpose flour, as it consistently yields excellent results. However, bread flour, with its higher protein content, would likely work well as a substitute, producing a slightly chewier and sturdier croissant. I haven’t tested with gluten-free flours, as croissant making relies heavily on gluten development for its structure and layers.
The most common reason for a dough failing to rise is inactive or expired yeast. Yeast is a living organism, and its potency can diminish over time. Always check the expiration date on your yeast. If you’re unsure, you can proof a small amount in warm (not hot) plant milk with a pinch of sugar; if it doesn’t become foamy within 5-10 minutes, your yeast is likely past its prime, and it’s best to start over with a fresh packet.
Soggy or dense croissants are almost always due to the butter becoming too warm within the dough. When the butter melts too quickly during the lamination process or during the final proof, it seeps into the dough rather than creating distinct layers. This prevents the steam from creating the signature flakiness. The key is to ensure your vegan butter is very cold at the start and remains cold throughout handling. If the dough feels soft or greasy, put it back in the refrigerator or freezer until it firms up before continuing.
These **homemade vegan croissants** are truly at their peak when enjoyed fresh from the oven, ideally within a few hours of baking. However, any leftovers can be stored in an airtight container at room temperature for 2 to 3 days. To refresh them, a quick warm-up in a toaster oven or regular oven for a few minutes will bring back some of their crispness.
Absolutely! Freezing is a great way to enjoy **bakery-style vegan croissants** whenever a craving strikes. Once baked and fully cooled, place the croissants in an airtight freezer-safe container or bag. They can be frozen for up to 3 months. To reheat, thaw them in the refrigerator overnight, then warm them in a preheated oven at 350°F (175°C) for about 5-10 minutes, or until heated through and crisp again. You can also freeze unbaked, shaped croissants. Arrange them on a baking sheet and freeze until solid, then transfer to a freezer bag. When ready to bake, place them on a parchment-lined sheet, allow them to thaw and rise at room temperature (which will take longer, possibly 2-3 hours), then proceed with baking as usual.

Explore More Vegan Bakery Favorites!
If you loved making these **flaky vegan croissants**, you’re sure to enjoy these other delightful plant-based treats from my kitchen:
- Irresistible Vegan Blueberry Scones
- Crispy and Sweet Vegan Apple Fritters
- Fluffy Vegan Blueberry Muffins
- The Best Gooey Vegan Cinnamon Rolls

Vegan Croissants
Learn how to make bakery-style Vegan Croissants in the comfort of your own kitchen. This easy-to-follow guide teaches you the ins and outs of this once complicated, now home baker-friendly pastry!
Pin Recipe
Comment
Ingredients
Croissants
- 4 cups all-purpose flour
- 1/3 cup granulated sugar
- 2 packets instant yeast (4 teaspoons)
- 1 1/2 teaspoons salt
- 1 1/4 cups cold vegan butter sticks (work best)
- 1 cup cold soy milk
Vegan Egg Wash
- 1 tablespoon pure maple syrup
- 2 tablespoons soy milk
Instructions
- Add the flour, sugar, yeast, and salt to a large bowl and whisk to combine.
- Slice the cold vegan butter into slices (about 1/8 inch thick) and toss them into the flour mixture with a spatula. Do not use a mixer; this will break up the butter too much. You want to simply toss it into the flour mixture.
- Pour in the milk and stir until a stiff, rugged dough with chunks of butter forms. Do not use your hands too much, as you don’t want to melt the butter.
- Wrap the dough tightly in plastic wrap (or other eco-friendly wrap) and chill in the refrigerator for 1 hour.
- After an hour, take the dough out of the refrigerator and place on a lightly floured surface. Roll the dough into a long rectangle shape. It will be messy and not look smooth at first, but it will get smoother as you fold and roll the dough.
- Fold the dough into thirds like you would fold a letter (see photos above for reference). Roll it out into a large rectangle, then turn the dough 90 degrees, and repeat the rolling/folding process 5 more times. You should see large streaks of butter but the dough should be smooth. If the butter starts to soften in the middle of this, return to the refrigerator or freezer until stiff again.
- Wrap tightly in plastic wrap again and chill in the refrigerator for another hour.
- Divide the dough in half (this makes it easier to work with) and roll one half into a large rectangle (about 20 inches long, 10 inches wide, and 1/8 inch thick). With a pizza cutter, trim away any uneven edges to make a clean rectangle.
- Slice the dough into smaller rectangles, then into triangles (see photos in post above). Cut a small slit at the wide end of the triangle, then tightly roll up into a crescent shape, making sure the tip is tucked underneath.
- Place on a parchment-lined pan and cover loosely. Allow the croissant dough to rise for 1 hour at room temperature, then place in the freezer or refrigerator for 30 minutes.
- While the croissants are chilling, preheat the oven to 375 degrees F (190 degrees C).
- In a small bowl, stir the maple syrup and soy milk together.
- Gently brush the syrup/milk mixture onto the dough, then place in the center rack of the oven and bake for 20-25 minutes, or until puffy and golden brown. Remove from the oven and enjoy.
Notes
- Overnight Croissants: After folding the dough (when you would refrigerate it for an hour), refrigerate overnight instead. In the morning, continue with the recipe as written. Once shaped into croissants, they may need a little extra time to rise at room temperature (about 2 hours if possible).
- Croissants are best when fresh but will last up to 3 days at room temperature in an airtight container. They can also be frozen after baking.
- You may use active dry yeast instead of instant dry yeast.
- You must make sure the vegan butter is cold when you begin, and at all times when laminating the dough. Do not let it get melted at all; return to the refrigerator or freezer if it gets warm.
Nutrition
Did you make this recipe?
Mention @nora_cooks_vegan_ or tag #noracooks!