
Unlock the Secret: Bake the Most Irresistibly Moist Red Velvet Marble Bundt Cake
Are you ready to transform your baking from good to absolutely legendary? Imagine presenting a stunning Red Velvet Marble Bundt Cake that not only captures every eye with its vibrant swirls but also melts in the mouth with unparalleled moistness and rich flavor. This isn’t just another cake; it’s a showstopper, and the best part? It starts with a simple box mix! In this comprehensive guide, we’re diving deep into the surprising “secret ingredient” that elevates an ordinary cake into an extraordinary culinary masterpiece. Get ready to discover the magic, master the mesmerizing marble effect, and crown your creation with a dreamy vanilla glaze. Your guests will be clamoring for the recipe, and you’ll be basking in the glow of endless compliments. Let’s embark on this delicious journey to bake the most phenomenal Red Velvet Marble Bundt Cake you’ve ever tasted!
The Unexpected Secret to Supreme Moistness: Mayonnaise!
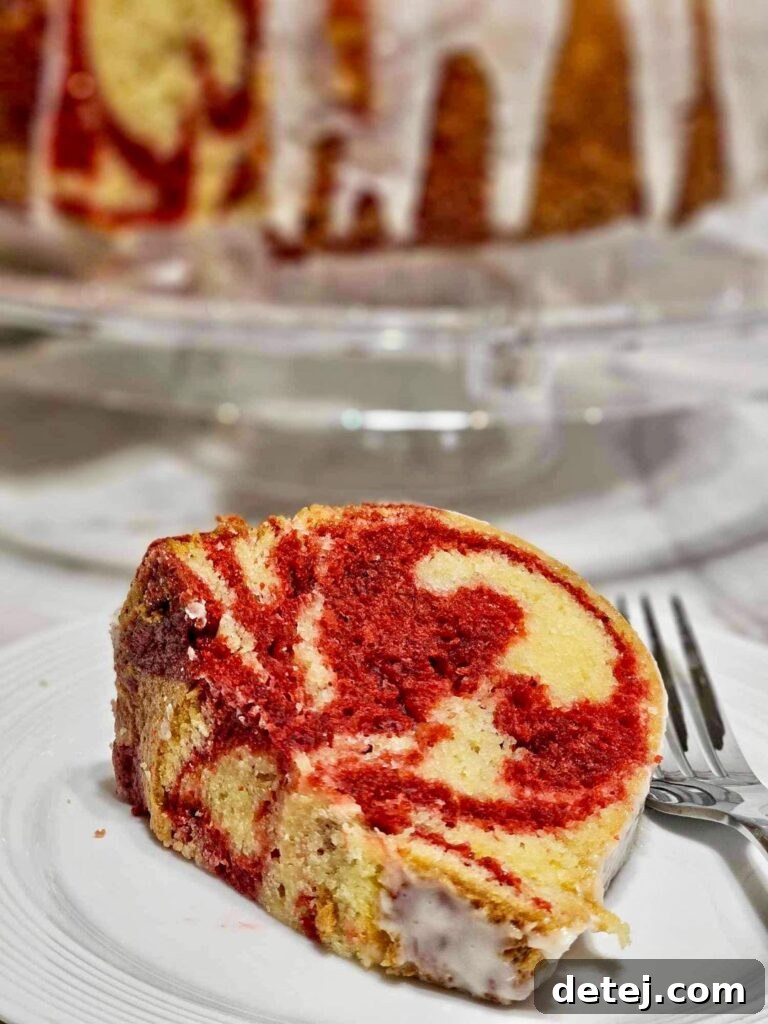
Yes, you read that right – the secret weapon for achieving an unbelievably moist and tender Red Velvet Marble Bundt Cake is mayonnaise! While it might sound unconventional, mayonnaise is essentially an emulsion of oil and egg yolks, two ingredients commonly found in rich cake recipes. When added to a box cake mix, it introduces extra fat and moisture, resulting in a crumb that is incredibly soft, fine, and never dry. It acts as a tenderizer, ensuring your cake remains moist for days, a quality often hard to achieve with standard box mix instructions. Don’t worry, the subtle tang of mayonnaise bakes away completely, leaving no eggy or savory taste, only pure, unadulterated cake perfection. This simple addition is a game-changer, guaranteeing a dessert that will truly impress. Besides this surprising ingredient, we’ll also be enhancing the box mix with a few other carefully selected additions to build layers of flavor and texture that no one will ever guess came from a box.
Mastering the Art of the Marble Effect for Visual Appeal
Beyond its incredible taste and texture, what truly sets this Red Velvet Marble Bundt Cake apart is its stunning visual appeal. The captivating marble effect, a swirl of vibrant red and creamy vanilla, makes this cake an instant centerpiece for any occasion. It’s a technique that looks sophisticated but is surprisingly simple to achieve, adding an artistic touch that elevates your baking from homemade to gourmet. The contrasting colors not only create a beautiful pattern but also hint at the delightful blend of flavors within. Getting the marble right is key to its show-stopping presence, ensuring each slice offers a unique, visually delightful experience. Let’s delve into how you can create these mesmerizing swirls, making your bundt cake a memorable treat that looks as good as it tastes.
Step-by-Step Guide to Baking Your Perfect Red Velvet Marble Bundt Cake
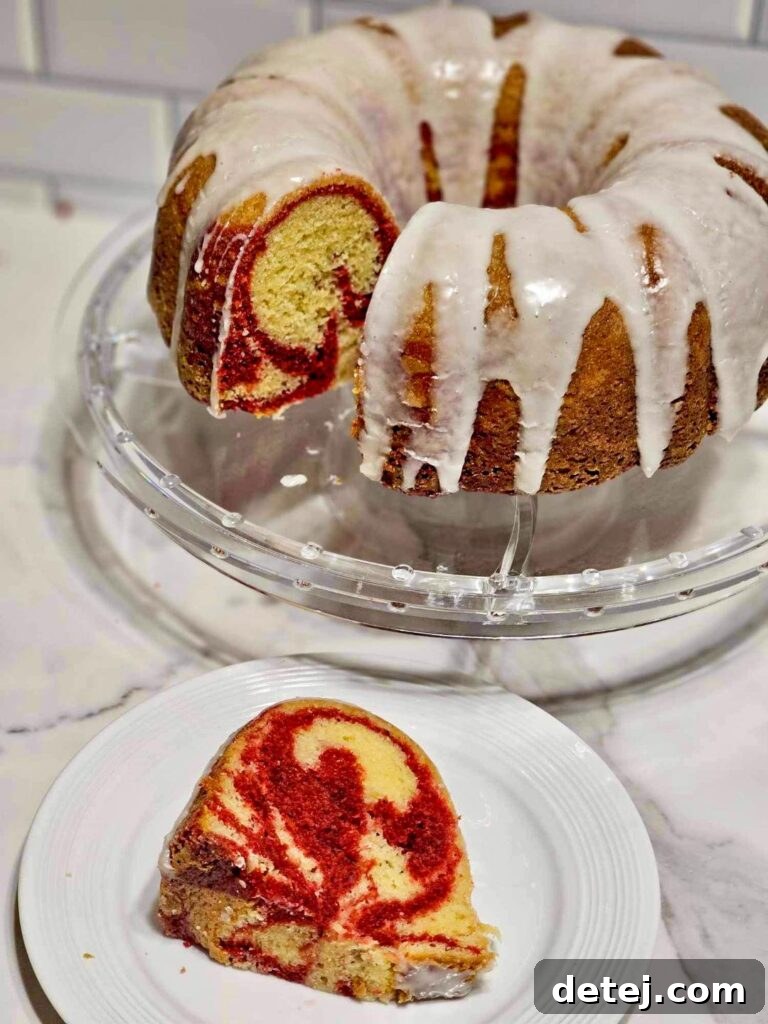
Creating this magnificent cake is an enjoyable process, and with our detailed instructions, you’re guaranteed success. Precision in preparation and patience during the process are your best allies for a flawless outcome.
1. Preparing Your Batter and Pan: The Foundation of Success
- Oven Preheat & Pan Preparation: Begin by preheating your oven to 350°F (175°C). Next, generously grease and flour a 12-cup Bundt pan. For superior flavor and a pristine release, I highly recommend using softened unsalted butter to grease the pan, ensuring every nook and cranny is coated. Dust with flour, tapping out any excess. This creates a non-stick barrier that helps the cake slide out effortlessly.
- Crafting the Vanilla Batter: In a large mixing bowl, combine the box classic yellow cake mix, 4 large eggs, 1 cup of all-purpose flour, 1 cup of granulated sugar, ¾ cup of room-temperature sour cream, ½ cup of vegetable oil, ½ cup of water, and the ¼ cup of mayonnaise. Start mixing on low speed with an electric mixer until all ingredients are just combined. Then, increase the speed to medium and beat for precisely two minutes. This ensures a smooth, well-aerated batter.
- Creating the Red Velvet Portion: Carefully transfer about 2 cups of the prepared vanilla batter into a separate medium bowl. To this, add 1 tablespoon of red food coloring and 1 tablespoon of unsweetened cocoa powder. Whisk thoroughly until the color is uniform and vibrant, creating your distinct red velvet batter.
2. Layering for the Perfect Marble Effect: Artistic Swirls
This is where the magic truly happens, transforming your batters into a work of art. The key is gentle layering to maintain distinct colors.
- First Layer: Pour approximately one-third of the plain vanilla batter evenly into the bottom of your prepared Bundt pan.
- Second Layer (Red Velvet): Carefully spoon half of the red velvet batter over the vanilla layer. Use the back of a spoon or a small offset spatula to gently spread it, creating a relatively thick, even layer. Avoid pressing down too hard or mixing it into the base layer.
- Repeating Layers: Follow with another layer of the remaining vanilla batter, then the second half of the red velvet batter. Finally, pour the last portion of the plain vanilla batter over the top. You should have alternating layers of light and dark batter.
- The Swirl: Once all the batter is layered, take a butter knife or a thin skewer. Gently insert it into the batter, touching the bottom of the pan, and move it through the layers in a graceful figure-eight or swirling motion. Do this only a few times – about 4-6 swirls around the pan. The goal is to create distinct marble patterns, not to fully blend the batters, which would result in a uniform color. Overmixing will diminish the beautiful contrast.
3. Baking to Golden Perfection: Patience is Key
- Baking Time: Place your Bundt pan into the preheated oven. Bake for approximately 50-55 minutes. Baking times can vary depending on your oven, so it’s always good to be vigilant.
- Checking for Doneness: The cake is ready when a wooden toothpick or skewer inserted into the center comes out clean, with no wet batter clinging to it. The top should be golden brown and spring back when lightly touched.
- Oven Calibration Tip: For consistent results, consider investing in an oven thermometer. Many home ovens can run hotter or cooler than their display indicates. If you know your oven tends to run hot, check for doneness 10-15 minutes earlier than suggested.
4. Cooling for Optimal Texture: The Critical Waiting Period
- Initial Cooling in Pan: This step is paramount for a perfectly structured, moist cake. Once baked, remove the Bundt pan from the oven and let it cool in the pan on a wire rack for a full hour. I cannot stress the importance of this enough! If you attempt to invert the cake while it’s still too hot, it’s very likely to stick, tear, or even break apart. The residual heat continues to cook the cake slightly and allows it to firm up, preventing structural collapse.
- Complete Cooling on Rack: After the initial hour, carefully invert the pan onto a wire rack. Gently lift the pan away. Allow the cake to cool completely on the wire rack. This allows any trapped steam to escape, preventing sogginess, and ensuring the cake reaches its ideal firm yet tender texture. This also prepares the cake perfectly for glazing.
Elevating Your Creation: The Heavenly Vanilla Glaze
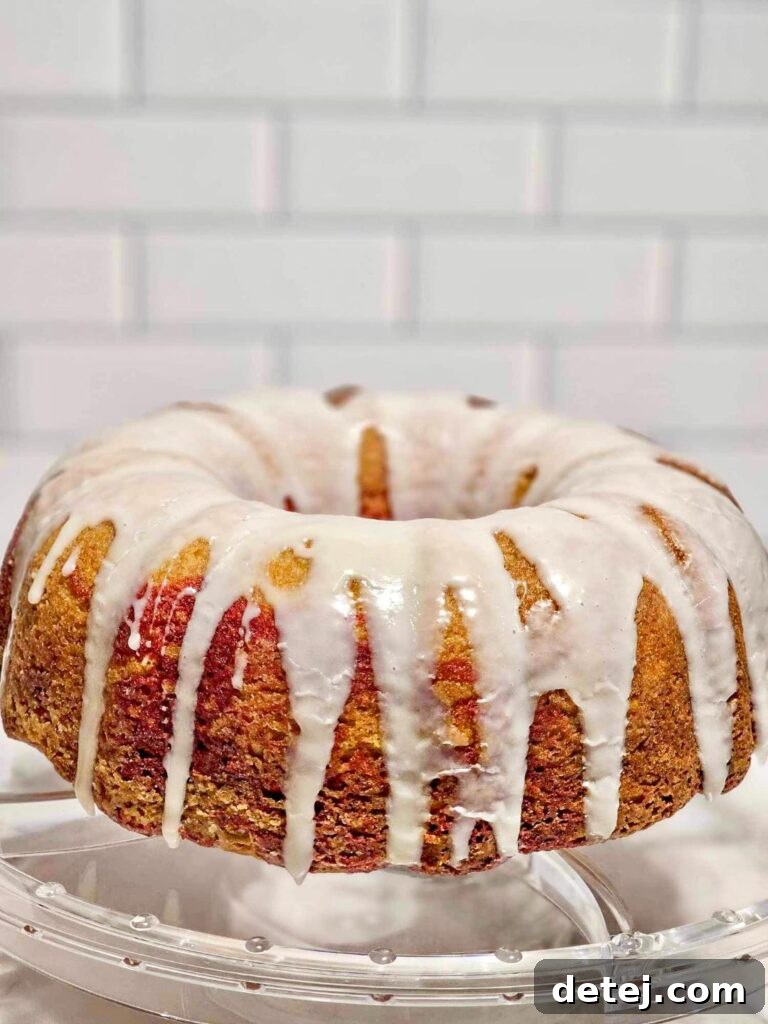
A truly spectacular bundt cake deserves a finish that is equally delightful. Our heavenly vanilla glaze provides the perfect balance of sweetness and elegance, taking your Red Velvet Marble Bundt Cake to new heights of indulgence. This simple glaze adds a lovely shine and an extra layer of vanilla flavor that complements the cake beautifully.
Crafting the Perfect Glaze: Simple Ingredients, Divine Results
- Ingredients: You will need 2 ½ cups of powdered sugar, 3 tablespoons of heavy cream (plus an additional teaspoon if needed), and 1 teaspoon of pure vanilla extract.
- Mixing: In a medium mixing bowl, whisk together the powdered sugar, heavy cream, and vanilla extract until the mixture is smooth and free of lumps. Start with 3 tablespoons of heavy cream. If the glaze appears too thick to drizzle, add the extra teaspoon of heavy cream, one tiny drop at a time, until you achieve the desired consistency. The ideal glaze should be thick enough to coat the back of a spoon but still flow effortlessly off it. It should not be watery, nor should it be too stiff.
Applying the Glaze: A Drizzled Masterpiece
- Placement: Once your Red Velvet Marble Bundt Cake has cooled completely, carefully transfer it to your preferred serving platter or cake stand.
- Drizzle with Finesse: Using a spoon or a small offset spatula, begin to drizzle the vanilla glaze generously over the top of the cake. Allow the glaze to cascade gracefully down the sides, creating beautiful drips and rivulets. Don’t be shy with the glaze; a good coating ensures every bite has that extra touch of sweetness and vanilla aroma.
- Setting: As the glaze dries, it will form a delicate, slightly hardened shell, adding a delightful textural contrast to the soft, moist cake beneath.
Optional Garnishes: A Touch of Elegance
To further enhance both the visual appeal and flavor, consider adding a final garnish:
- Fresh Berries: Bright red raspberries or sliced strawberries offer a beautiful pop of color and a refreshing tartness that cuts through the cake’s richness.
- Chopped Nuts: A sprinkle of finely chopped pecans, walnuts, or almonds adds a delightful crunch and nutty undertone.
- Chocolate Shavings: For an extra decadent touch, garnish with curls of white or dark chocolate.
With the heavenly vanilla glaze and your chosen garnishes, your Red Velvet Marble Bundt Cake is now complete. It’s a dessert that speaks volumes of your baking prowess and will undoubtedly be the star of any gathering. Slice into this moist, delicious masterpiece and prepare for the accolades!
As you present this beautiful creation, your loved ones will be drawn in by the irresistible flavors and eye-catching presentation.
Krystel’s Cooking
In conclusion, you are now equipped with the ultimate secret and the skills to create the most unforgettable Red Velvet Marble Bundt Cake. By embracing the unexpected secret ingredient – mayonnaise – you’ll transform a simple box mix into a moist, tender, and deeply flavorful dessert that defies its humble origins. The captivating marble effect ensures your cake is not just a treat for the palate but also a feast for the eyes, perfect for making a grand statement at any celebration. Our comprehensive step-by-step instructions ensure that from pan preparation to the final drizzle of vanilla glaze, your baking journey will be smooth and rewarding. This recipe is more than just instructions; it’s an invitation to elevate your baking, showcasing your talents during special occasions like Christmas, Valentine’s Day, or any moment that calls for a touch of homemade elegance. Get ready for a deluge of compliments and requests for this recipe!
So, tie on your apron, preheat that oven, and let the magic unfold in your kitchen. Remember, as the saying goes, “One cannot think well, love well, sleep well if one has not dined well.” And with this spectacular bundt cake, you’ll certainly be dining exceptionally well. Happy baking!
Recipe: Yellow and Red Velvet Marble Bundt Cake
Servings: 12
Prep Time: 20 minutes
Cook Time: 50 minutes
Total Time: 1 hour 10 minutes
Author: Krystel
Ingredients
Cake Mix:
- 1 box classic yellow cake mix (I used Duncan Hines)
- 4 large eggs
- 1 cup all-purpose flour
- 1 cup granulated sugar
- ¾ cup sour cream, room temperature
- ½ cup vegetable oil
- ½ cup water
- ¼ cup mayonnaise
- 1 tablespoon red food coloring
- 1 tablespoon cocoa powder
- 2 teaspoons vanilla extract
Vanilla Glaze:
- 2 ½ cups powdered sugar
- 3 tablespoons heavy cream, plus an additional 1 teaspoon if needed
- 1 teaspoon vanilla extract
Instructions
For the cake:
- Preheat the oven to 350°F (175°C) and generously grease and flour a 12-cup Bundt pan. (Using softened butter is recommended for better flavor and easier release!) Set it aside.
- In a large bowl, combine the box classic yellow cake mix, eggs, all-purpose flour, granulated sugar, sour cream, vegetable oil, water, mayonnaise, and vanilla extract. Start mixing on low with an electric mixer until well combined, then increase the speed to medium and beat for two minutes.
- Transfer approximately 2 cups of the batter to a separate medium bowl. Stir in the red food coloring and cocoa powder until well combined and the color is vibrant. This is your red velvet batter.
- Pour one-third of the plain (vanilla) batter evenly into the prepared Bundt pan.
- Carefully layer half of the red velvet batter on top of the vanilla layer, distributing it evenly with a spatula.
- Repeat this layering process: add another third of the plain batter, then the remaining red velvet batter, and finally, the last portion of the plain batter over the top.
- Once all batter is layered, take a butter knife or skewer and gently swirl it through the layers in a figure-eight or circular motion 4-6 times to create the marble effect. Be careful not to overmix.
- Bake in the preheated oven for 50-55 minutes or until a toothpick inserted into the center comes out clean.
- Allow the cake to cool completely in the pan for about 1 hour on a wire rack. This is crucial for easy release and cake structure.
- After cooling in the pan, carefully invert the cake onto a serving platter or wire rack to cool completely before glazing.
For the vanilla glaze:
- In a large bowl, whisk together the powdered sugar, heavy cream, and vanilla extract until smooth. Adjust consistency with an additional teaspoon of heavy cream if necessary.
- Drizzle the vanilla glaze over the completely cooled Bundt cake, allowing it to cascade down the sides.
- Serve and enjoy your beautiful and delicious Red Velvet Marble Bundt Cake!
Nutrition Information (Approximate per 3-inch slice)
- Serving: 1 (3 inch slice)
- Calories: 536 kcal
- Carbohydrates: 86g
- Protein: 5g
- Fat: 20g
- Saturated Fat: 5g
- Polyunsaturated Fat: 8g
- Monounsaturated Fat: 5g
- Trans Fat: 0.2g
- Cholesterol: 69mg
- Sodium: 371mg
- Potassium: 83mg
- Fiber: 1g
- Sugar: 61g
- Vitamin A: 227 IU
- Vitamin C: 0.2mg
- Calcium: 119mg
- Iron: 2mg